

Hi SharePoint guys,
In the past few weeks, I focused on Node.js and how to leverage this awesome technology to build stuff in the SharePoint area. It is really a great opportunity to better understand what is behind the scene in SharePoint provider-hosted addins. During my experimentation, I implemented a node module to help handling SharePoint common tasks (such as authentication and REST requests, ...). But this will be the topic of a future blog post ! Today, we will discuss something else. Great fresh news for the Office 365 & SharePoint developers community,
SharePoint Webhooks are now Generally Available !
https://dev.office.com/blogs/sharepoint-webhooks-is-now-generally-available-build-service-oriented-processes-in-sharepoint
What is a Webhook ?
Webhooks tend to become a standard since most of the biggest platforms on the Web ( GitHub, Facebook, Wordpress, VisualStudioOnline, DropBox, PayPal, ...) leverage them. In a few words, a Webhook is a simple HTTP callback triggered by an event on a system.
Yes... a new name for Remote Event Receivers !
Not at all! Even if the Remote Event Receivers and Webhooks allow to trigger a process after an event, RER and Webhooks do not offer the same capabilities and specificities.
Webhooks
- Webhooks are simple HTTP POST handlers
- Can be easily implemented in any technology that offers HTTP capabilities
- Only notify "something happened" but not the involved item details or even the kind of event. The event nature should be discovered subsequently via the ChangeItem API
- Asynchronously triggered after an item changed
- Available only for list item changes
- Long-running processes should be implemented in background jobs triggered by the webhook
- The callback should send a response within 5 seconds
Remote Event Receivers
- More complex and heavyweight software architecture than Webhooks (WCF services with .NET classes)
- Handles synchronous (-ing) before the actual update and asynchronous events (-ed) after the actual update on items
- Can be triggered by specific events (add, update, delete)
To summary, RERs will remain for synchronous events handling while Webhooks coupled with background jobs can meet all other needs.
Implement a Webhook with Node.js
It is pretty easy to implement a SharePoint WebHook with Node.js! let's prepare our application.
Prerequisites
- You need a proper Node environment (Check my previous post about Node.js)
- You need to get the Ngrok tool
- You need a SharePoint online site collection
Let's start !
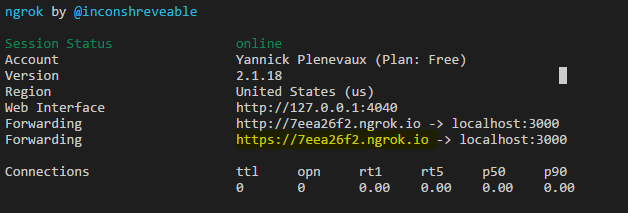
- Let's start Ngrok to get your temporary public URL:
ngrok http 3000 --host-header=localhost:3000
Copy the given HTTPS url.
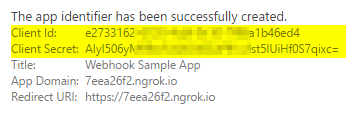
In SharePoint, register a new App (http://tenant.sharepoint.com/
/_layouts/15/appregnew.aspx) - Paste the public url as the Redirect URI, and paste the domain (Note: It doesn't really matter since we will stick to app-only in this sample app. However, it would be necessary in a app+user context since SharePoint has to post the app context to your app)
- Click the Create button and copy the Client ID and Client Secret in a safe location.
Make sure your app has sufficient and app-only policy enabled permissions
- Go to http://tenant.sharepoint.com/
/_layouts/15/appinv.aspx - Copy/Paste the Client Id into the field App Id (1)
- Click the Lookup button (2)
- Copy/Paste the permissions XML into the text area (3)
<AppPermissionRequests AllowAppOnlyPolicy="true"<AppPermissionRequest Scope="http://sharepoint/content/sitecollection" Right="FullControl" /> </AppPermissionRequests>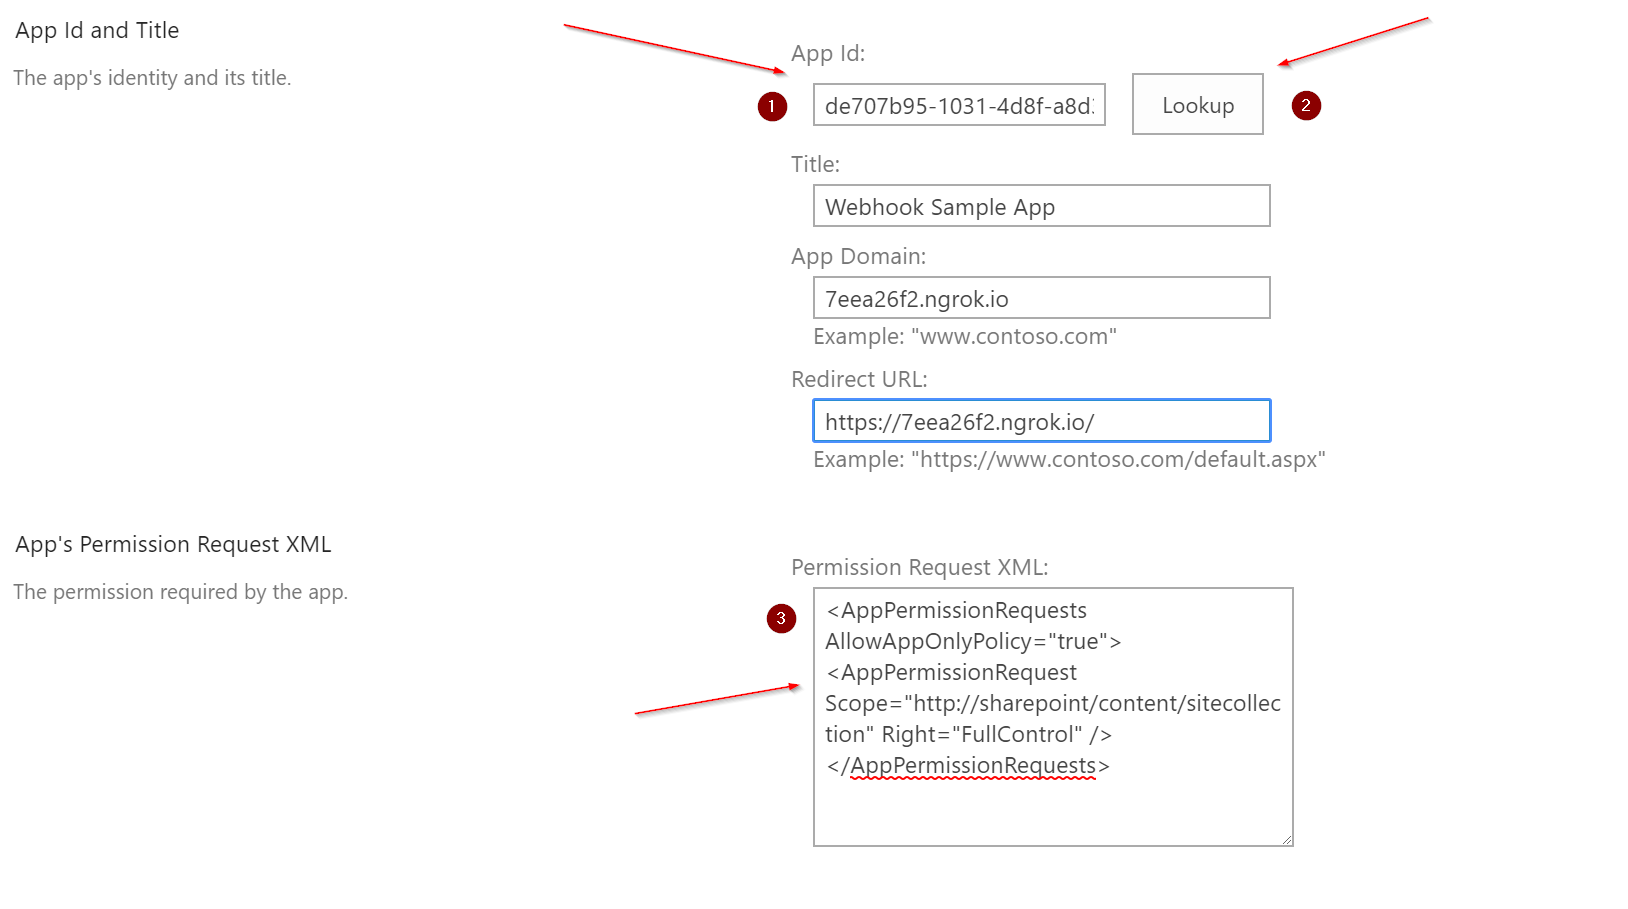
- Click the "Create" button to apply the permissions
- Go to http://tenant.sharepoint.com/
Create a workspace directory on your local dev environment
In your directory, from the terminal, type
npm install express-generator -g > express
- In the generated package.json file, add the following dependencies
...
"node-fetch": "^1.6.3",
"spaddin-helper": "git+https://github.com/ypcode/node-spaddin-helper.git"
...
(Notice the spaddin-helper which is my node module currently hosted in my github repo)
- Install the modules
npm install --save
- Besides the app.js file, create a config.js file with the following content :
var config = {
  ClientId : "<your client Id>",
  ClientSecret : "<your client secret>",
  SPHostUrl : "<your SharePoint site url>",
  WebhooksUrl: "<your ngrok public url>/webhooks"
};
module.exports = config;
(Replace the values by yours)
- In the app.js file, add the following lines (for example at line 10)
var config = require("./config");
var sp = require("spaddin-helper");
sp.SharePointAddinConfiguration.init(config.ClientId, config.ClientSecret);
Test our app
To make sure our app is properly configured, we can try to display a simple property from our SharePoint site. CAUTION: Since we are in App-Only mode, we cannot query users information. For instance, you can replace the content of the routes/index.js file by the following
var express = require('express');
var router = express.Router();
var sp = require("spaddin-helper");
var config = require("../config");
/* GET home page. */
router.get('/', function(req, res, next) {
  let ctx = new sp.SharePointContext(config.SPHostUrl);
  ctx.createAppOnlyClientForSPHost().then(client => {
    client.retrieve('_api/web/Title')
    .then(data => {
      let webTitle = data.d;
      res.render('index', { title: "WebHook on site " + webTitle });
    })
    .catch((error) => { res.render('error', { error: error }); });
  });
});

module.exports = router;
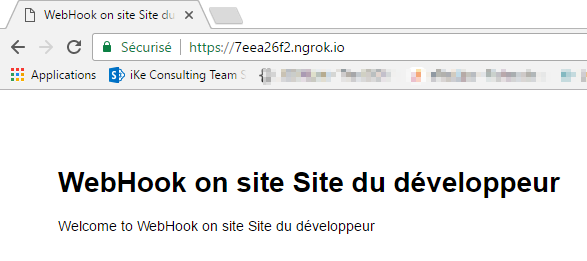
You can run your app by executing the npm start command, try to reach the public (ngrok) URL of your site: We are now ready to continue with the Webhook matters
Subscribe a Webhook
Currently, the only way to subscribe to a SharePoint Webhook is through a call to the SharePoint REST API.
How does it work ?
You have to issue a HTTP POST request to
{
  "resource": "<webUrl>/\_api/web/lists('list-of-id')",
  "notificationUrl": "https://yourserver/foo/bar/",
  "expirationDateTime": "2017-06-01T00:00:00+00:00"
}
When receiving the subscription request, SharePoint will try to validate your Webhook by sending it a POST request with a query string parameter called "validationtoken" that has a random value, your endpoint should respond to this request with the random value in the body.
In our Node app
We will build a basic UI that allows to subscribe a Webhook to a specific list. Let's add the UI, in the routes/index.js file, add the following right after the / route handler
[code language="javascript"] router.get('/subscriptions', (req, res) => { let ctx = new sp.SharePointContext(config.SPHostUrl); ctx.createAppOnlyClientForSPHost().then(client => { let vm = { lists: [] }; // We retrieve all the lists of the current web client.retrieve('_api/web/lists?$select=Title,Id') .then(data => { // Add the results to the ViewModel vm.lists = data.d.results; }).then(() => { res.render('subscriptions', vm); }).catch((error) => { res.render('error', ); }); }); }); [/code]
In this route handler, we retrieve all the lists of the current web and pass them to the view. Let's add this view. Add a new file subscriptions.jade in the views folder with the following content
extends layout
block content
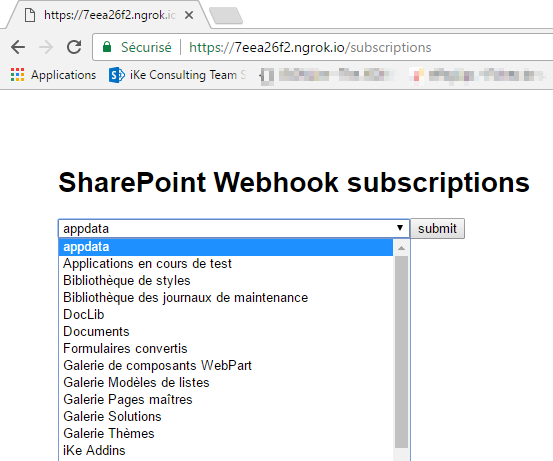
h1 SharePoint Webhook subscriptions
form(action="/subscriptions", method="POST")
if subscriptionCreated
div Subscription has been requested for list #{listId}
else
div select(name="listId")
each list in lists
option(value=list.Id) #{list.Title}
input(type="submit",name="submit",value="submit")
We have now to implement the backend for this UI, in the routes/index.js file, add the following
 router.post('/subscriptions', (req, res) => {
   let ctx = new sp.SharePointContext(config.SPHostUrl);
   // We verify the listId POST argument
   let listId = req.body.listId;
   if (!listId) {
     res.send(400);
     // Bad request
     return;
    }
    ctx.createAppOnlyClientForSPHost().then(client => {
      // Content Type is not ODATA but regular JSON
      client.odataVerbose = false;
      client.create(`\_api/web/lists('${listId}')/subscriptions`,{
        resource: ctx.SPHostUrl + `\_api/web/lists('${listId}')`,
        notificationUrl: config.WebhooksUrl,
        expirationDateTime: "2017-02-18T00:00:00+00:00"
        })
        .then((resp) => {
          let error = resp\["odata.error"\];
          if (error) {
            res.render('error', {
              message: error.message.value,
              error:{status:"",stack:""}
            });
          } else {
            res.render("subscriptions", {
              subscriptionCreated:true,
              listId: listId
              });
          }
        })
        .catch((error) => {
          res.render('error', {error:error});
        });
    });
  });
And we have the subscriptions basic (and UGLY ;) ) UI.
With this in place, we almost have everything to subscribe the Webhook. Remember I mentionned above that the Webhook endpoint has to be validated on registration, this is achieved by a reply from the Webhook to SharePoint
The Webhook endpoint
The Webhook endpoint is responsible for the notification handling as well as its self validation during the subscription process. As already stated, it is nothing more than a handler to a HTTP POST request. To stay clean, we will implement a dedicated route for the WebHook business. In the routes folder, add a webhooks.js file and put the following content in it :
var express = require('express');
var router = express.Router();
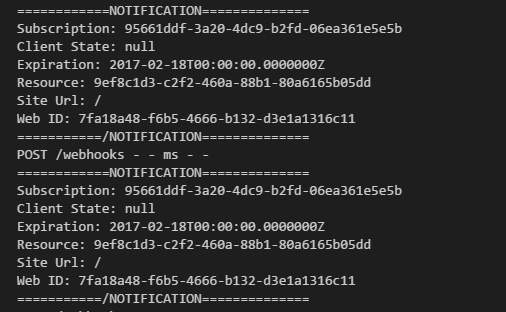
const handleNotification = (data) => {
console.log("============NOTIFICATION==============");
console.log(`Subscription: ${data.subscriptionId}`);
console.log(`Client State: ${data.clientState}`);
console.log(`Expiration: ${data.expirationDateTime}`);
console.log(`Resource: ${data.resource}`);
console.log(`Site Url: ${data.siteUrl}`);
console.log(`Web ID: ${data.webId}`);
console.log("===========/NOTIFICATION==============");
};
// Webhook handler
router.post('/', (req, res) => {
// Validate if new subscription
if (req.query.validationtoken) {
// Return a text/plain Success response
// with the validationtoken query string parameter
res.setHeader("Content-Type", "text/plain");
res.send(200, req.query.validationtoken);
return;
}
let payload = req.body.value;
if (!payload) {
res.send(400, "Bad Request");
return;
}
if (Array.isArray(payload)) {
payload.forEach(notification => {
handleNotification(notification);
});
} else {
handleNotification(payload);
}
res.send(200, "OK"); });
module.exports = router;
The code above will validate the Webhook in the case of a subscription validation, otherwise it will process the notification, in our case, it will simply output the notification content in the console. The final thing to do is to configure this route in our app.js file
- Replace the line 9 var users = require('./routes/users');) by var webhooks = require('./routes/webhooks');
- Replace the line 28 app.use('/users', users); by app.use('/webhooks', webhooks);
- (You can also delete the routes/users.js file which is useless in our case)
You can now
- launch your application (npm start)
- go to the subscriptions page (
/subscriptions ) - Subscribe a Webhook to the list of your choice
- Test modifying list items in this list
- See the incoming notifications in your debug console
Here we go, a simple SharePoint Webhook implemented in Node.js.

You can check out the complete sample implementation here: https://github.com/ypcode/samples/tree/master/sp-webhooks-sample-pub
Hope you enjoyed reading this, please give your feedback !
Yannick