
Hi guys,
This post is part of a series of articles introducing Node.js.
- Part 1 : the basics
- Part 2 : NPM (this tutorial)
- Part 3 : Express.js
- Part 4 : Productivity Tools
If you read my previous post about the basics of Node.js, you probably realized the strengths it has due to its low level. But you probably foresee as well the huge lack of productivity there would be if you had to build complex and large applications from scratch. Don't worry, if Node.js is so popular, there must be a reason. There are actually several reasons. In this article, we will mention two big ones of them: NPM & Express.js. This post focuses NPM, the upcoming post will focus Express.js.
NPM : Node Package Manager
If you are a .NET Developer, you are probably familiar with Nuget in Visual Studio that allows you to install packages and dependencies into your projects. NPM is actually the "Nuget for Node". NPM allows to easily manage the external dependencies of your Node solution. You can choose to install a package locally (in your solution directory) or globally (in your user directory). In your Node code, you can then reference the libraries through the require() "directive". NPM is also a repository that hosts more than 350 000 packages of all kinds of frameworks, libraries and other building blocks...
Using or "Require" a module in Node
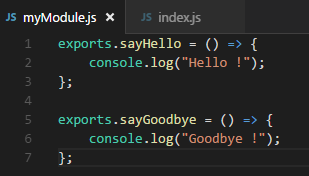
Node implements the CommonJS Modules specification. To summary, a module (or a part of a module) can be referenced by assigning the return of the require() function to a variable in your source code. The module exposes its components with the exports variable.

I set the functions of my module as members of the exports object
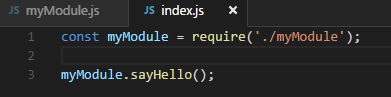
I require my module, notice the argument is ./myModule; the relative path to my JS file without the .js extension. My module is then referenced by the variable myModule, I can then use its members
Install a third-party module in my project
Let's say I want to use the popular helper library underscore.
Install the last available version
In a terminal (within your project folder), type
npm install underscore
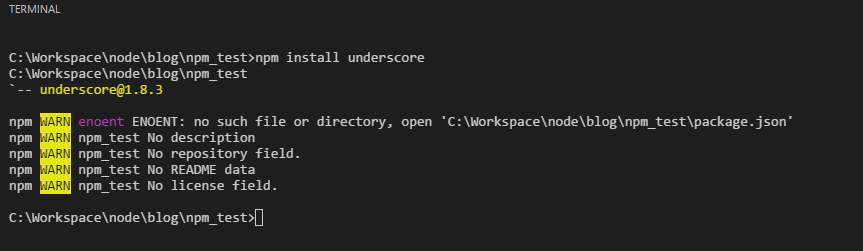
For now, don't worry about the warning messages.

You can see in your working directory that a node_modules (1) subdirectory has been created, this new directory contains a directory named underscore (2). That one, in turn, contains the files of the underscore module we have just installed.
CAUTION: The modules from NPM are JavaScript and most likely Open Source. However, you should take the habit of never modifying the source code directly within the node_modules folder. The simple reason is, the node_modules folder contains the modules managed by NPM, it means, if you update the module to a different version, your changes will be lost. You'd rather want to fork the open-source project or create your own node module containing your modified source files.
I can then use the underscore module

Notice here the argument of require() is not a relative path. In this case, Node will fetch the module either in globally or locally installed node modules.
Install a specific version of a module
If, for some reasons, you need a specific version of a module, you can specify it by appending @
npm install underscore@1.6
Modules in larger projects
So far, we only installed a couple of modules. In bigger projects, we usually use many more modules, it would be really cumbersome to install them one by one with the command. Fortunately, there is a simpler way to handle this : package.json It is a file that contains the properties of the project (the package).
- The name of the package
- Information about the author
- dependencies
- ...
It is totally acceptable to create this file from scratch, however, I think it is easier (especially in your first steps) to run a command : npm init
You will be asked to give the properties of the project. When done, you will see that the package.json file has been created. To go quicker, you can also run : npm init --yes This will generate a package.json file with default values and the current directory's name as the name of the package. To specify the dependencies of the package, a property "dependencies" should be added in the package.json file (Note: If you already have installed some modules with the npm install command, they will already be included in the generated package.json file)
...
 "dependencies": { "underscore": "^1.8.3" },
...
the dependencies property is a JS Object which as name of the dependencies as members' names and the version selector as the value. The selector could be :
- * or "" // any version
- 2.3.x // versions 2.3.0, 2.3.1, ..., 2.3.n but not 2.4
-
=2.3 // minimum version is 2.3.0
- <2.3.7 // less than to 2.3.7
- 2.3 - 2.4 // equivalent to ">=2.3 <=2.4" or "2.3.x"
The list above is not exhaustive, please refer to node package versions documentation for more complete information. We can then specify all the required modules in the package.json file
...
"dependencies": {
  "underscore":"*",
  "morgan":"*",
  "jsonwebtoken":"*"
  },
...
To install all the modules in a single command, type in the terminal:
npm install
All your specified modules and their dependencies will be installed in your projects. The package.json file has a lot of other properties. I really encourage you to check out this page for official documentation. NPM is a package and dependencies manager but it is so popular that it really rules the development techniques, tooling and conventions in Node projects. There is a lot more to learn about NPM, I really encourage you to see more on the NPM official website
In the next post, we will focus on Express.js to develop a real-world application.
Leave your comments and feedback
Yannick