
Hi Devs !
In this article, I want to focus on something that might be a common requirement for many organisations.
How could we expose our list of products we manage in our SharePoint Online on our public web site ?
As you may know, it is not possible to configure an anonymous access to a SharePoint Online site. Then, it is not possible to create a SharePoint site dedicated to public web. However, your customer might not want to take care of some kind of sync process for the information primarly managed on his SharePoint. There is a very simplistic solution: Access your SharePoint data in app-only context from your public facing web application.
Isn't it super complex ?
Not at all ! It is, actually, the same as you would do when fetching data from a SQL database or any other data repository.
OK, do I need a specific technology? a specific environment ?
For the implementation, it can (theoritically) be done in any kind of technology capable of issuing web requests. However, there are already built and proven tools for ASP.NET or Node.js. For the sake of simplicity, the example in this post will make use of ASP.NET MVC. Since, it can be achieved in almost any tech and language, the environment (host, etc...) does not really matter ! The only requirement is that the server is allowed to issue web requets to the Internet.
Let's do it !
The data repository
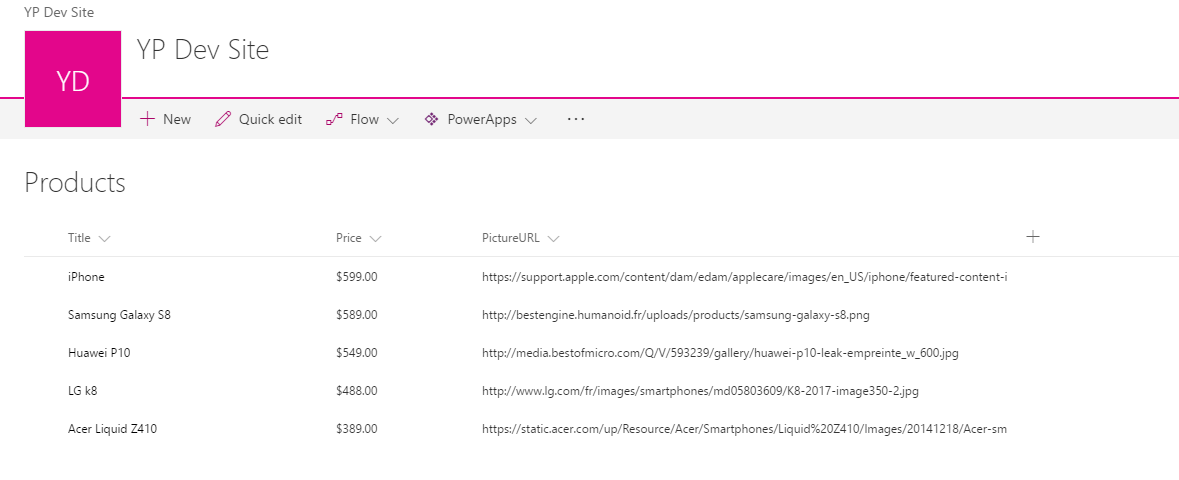
As a context, I will consider we want to expose a list of products existing in a SharePoint Online site. My list is named "Products" and has the following fields:
- Title (built in field)
- PictureURL (Text)
- Price (Currency)
I already populated it with some fake data and pictures URL found on Google Images

The application permissions
In order to allow our public web application to fetch our data stored in SharePoint. We need to ask SharePoint for permissions. go to _https://yourtenant.sharepoint.com/sites/yoursitepath/layouts/15/appregnew.aspx (yourtenant and yoursitepath are obviously to change according to your site) On this page, you will have to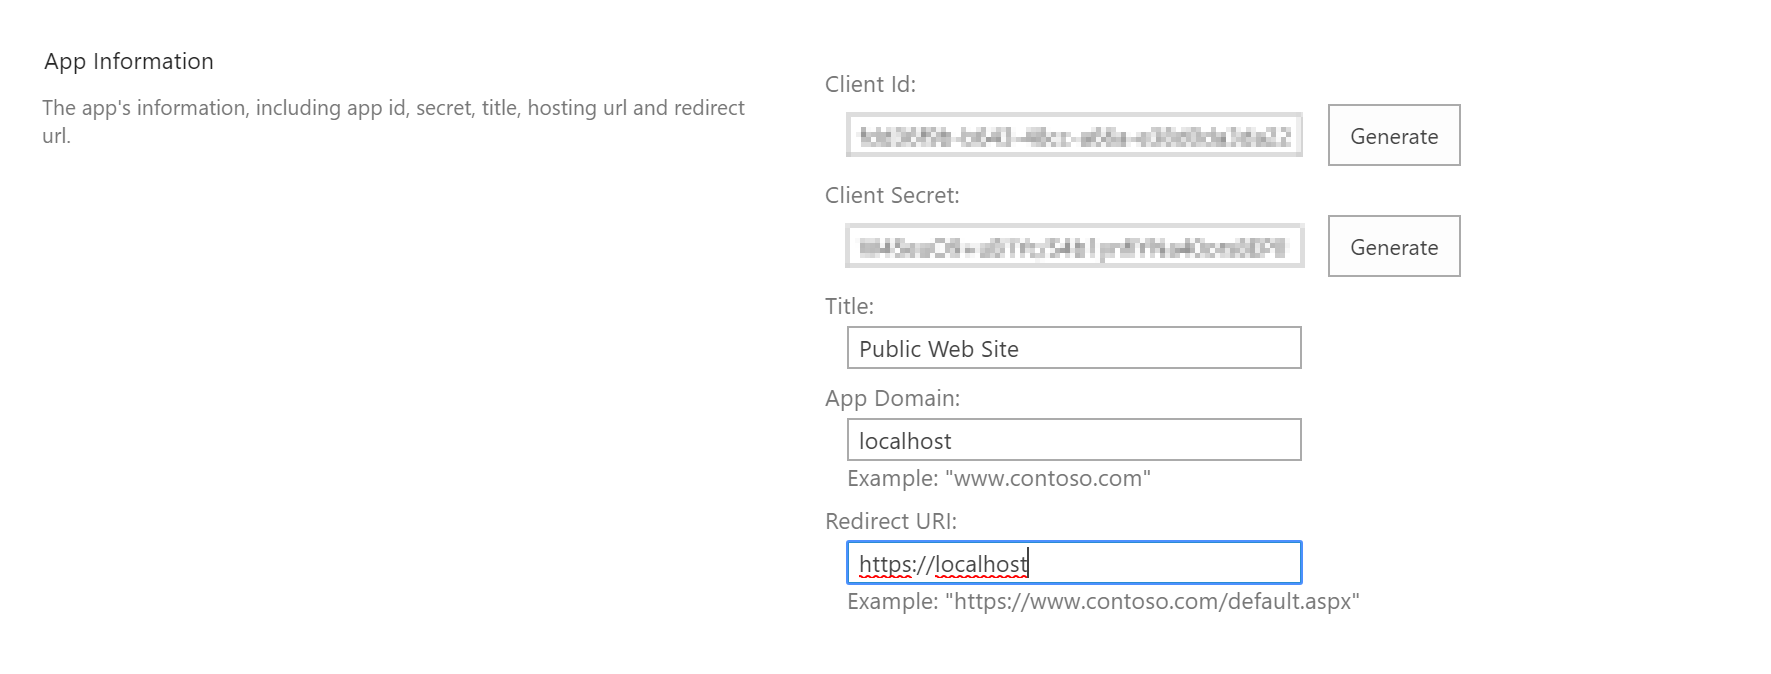
generate a Client ID and Client Secret (simply click both "Generate" buttons.
- Choose a name for your application
- Enter "localhost" for the domain
- Enter "https://localhost/" for the redirect URL. (https:// is mandatory here)
Actually, only the Client Id and Client Secret really matter in our case but we need to enter all these for the application to be registered. Click the _Create _button and copy/paste in a safe location the content of the next page. You will NOT have any opportunity to recover the Client Secret later on. Now that we have registered our application, we have to grant it some permissions. go to _https://yourtenant.sharepoint.com/sites/yoursitepath/layouts/15/appinv.aspx (yourtenant and yoursitepath are obviously to change according to your site) Enter your ClientId in the App Id input box and click Lookup. Make sure the values appearing in the following input boxes correspond to your registered app.
In the Permission Request XML text area, copy/paste the following
<AppPermissionRequests AllowAppOnlyPolicy="true">
  <AppPermissionRequest Scope="http://sharepoint/content/sitecollection/web" Right="Read"/>
</AppPermissionRequests>
Since here, we want our application to only read content from SharePoint, we define the scope and granted right of the permission as so. You can get more info about permissions request XML here : https://dev.office.com/sharepoint/docs/sp-add-ins/add-in-permissions-in-sharepoint
Note on permissions: You should always make sure your app does not have permissions it does really need. This will prevent security breach and potential bugs affecting your content. This rule is actually valid in any permissions-related context (Smartphone apps, user access, ...). Grant too much permissions to anything or anyone is always a risk of unattended behaviors
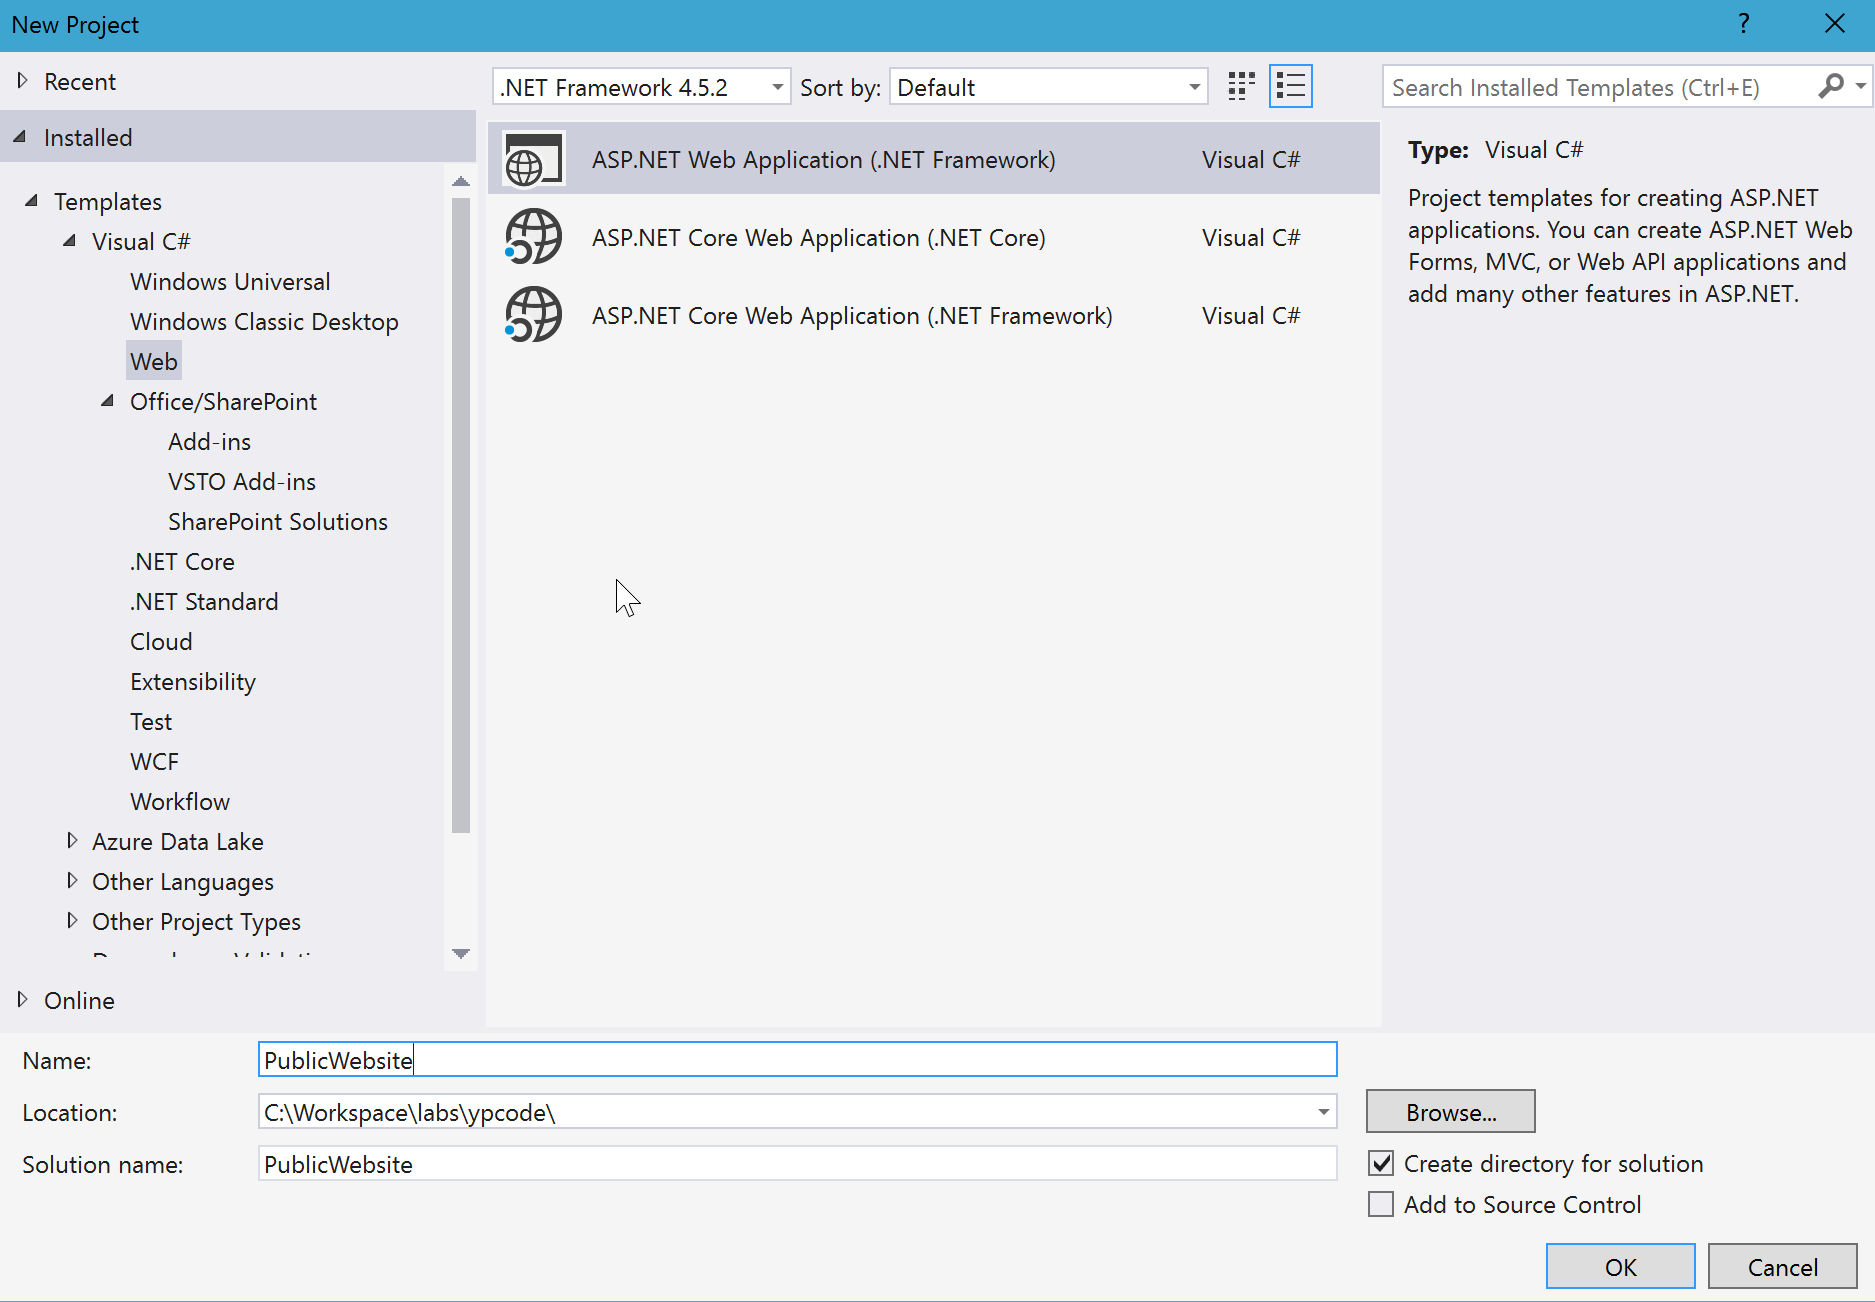
The application project
In Visual Studio, create a new ASP.NET MVC application project

In order to ease the development plumbing, we will use the PnP Core (Online) library. In the Package Manager Console, type the following command:
Install-Package SharePointPnPCoreOnline
Create the AppConfig class and define the App Settings
We create here a class that will expose easily our AppSettings: Add a new class named AppConfig and put the following content in it
 public static class AppConfig
 {
   public static string SPHostUrl { get { return ConfigurationManager.AppSettings\[nameof(SPHostUrl)\]; } }
   public static string ClientId { get { return ConfigurationManager.AppSettings\[nameof(ClientId)\]; } }
   public static string ClientSecret { get { return ConfigurationManager.AppSettings\[nameof(ClientSecret)\]; } }
 }
In the Web.config file in your project root directory, add the following lines inside of the
<add key="SPHostUrl" value="https://yourtenant.sharepoint.com/sites/yoursite/" />
<add key="ClientId" value="fdd36f9b-xxxxxxxxxxx-a3da22" />
 <add key="ClientSecret" value="W45euOxxxxxxxxxxxxxxxxxxxx01FSwe2wLo=" />
Where you have to replace the values by your own (in the information you kept earlier in a safe location)
Create the Product ViewModel
In the Models folder, add a new class named ProductViewModel and put the following code in it [code language="csharp"] public class ProductViewModel { public int Id { get; set; } public string Title { get; set; } public string PictureUrl { get; set; } public float Price { get; set; } } [/code]
Create the Products MVC controller
Right-click the "Controllers" folder and select Add > Controller Select "MVC 5 Controller - Empty" Choose a name for your controller (e.g. _ProductsController)

Add the following method in the ProductsController class
 // Add the following using statements
 using Microsoft.SharePoint.Client;
 using OfficeDevPnP.Core;
 ....

 private IList<ProductViewModel> GetProducts() {
   // Get app Only Content from app ClientId/ClientSecret
   using (var clientContext = new AuthenticationManager().GetAppOnlyAuthenticatedContext(AppConfig.SPHostUrl, AppConfig.ClientId, AppConfig.ClientSecret)) {
     // Get the products list
     List productsList = clientContext.Web.GetListByUrl("/Lists/Products");
     // Get all items
     var listItemsCollection = productsList.GetItems(new CamlQuery());
     clientContext.Load(listItemsCollection);
     clientContext.ExecuteQueryRetry(); // Make a collection of ProductViewModel objects from the fetched SharePoint list items
     var results = listItemsCollection.Select(li => new ProductViewModel {
       Id = li.Id,
       Title = (string)li["Title"],
       Price = (float)(double)li\["Price"\],
       PictureUrl = (string)li\["PictureURL"\] })
       .ToList();
      return results;
    }
}
and replace the content of the Index() method by
return View(GetProducts());
Create the Products MVC view (Html page)
In the Views/Products folder, add a index.cshtml file and put the following content in it:
@model IEnumerable<PublicWebsite.Models.ProductViewModel>
@{ ViewBag.Title = "Our products"; }
<h1>Smartphone Catalog</h1>
<div class="ms-Grid">
  <div class="ms-Grid-row">
    @foreach (var p in Model) {
      <div class="ms-Grid-col ms-u-sm12 ms-u-md6 ms-u-lg3">
        <div class="product">
        <img class="picture" src="@p.PictureUrl" />
          <div class="title">@p.Title</div>
          <div class="price">@p.Price $</div>
        </div>
      </div>
    }
  </div>
</div>
Notes:
- You will have to adapt the namespace to your own in the @model directive
- I am using the Office UI Fabric and some custom CSS classes
[Optional] To get the same rendering as I do
Replace the content of the /Views/Shared/_Layout.cshtml file by
<!DOCTYPE html> <html> <head> <meta charset="utf-8" /> <meta name="viewport" content="width=device-width, initial-scale=1.0"> <title>@ViewBag.Title - Smartphone Provider</title> @Styles.Render("~/Content/css") <link rel="stylesheet" href="https://static2.sharepointonline.com/files/fabric/office-ui-fabric-core/4.1.0/css/fabric.min.css"> </head> <body> <div class="container body-content"> @RenderBody() <hr /> <footer> © @DateTime.Now.Year - SmartPhone Provider </footer></div> </body> </html>
and the content of the /Content/Site.css file by
body { width:80%; margin: auto; }
.product { text-align: center; padding: 10px; background-color: aliceblue; border: 1px solid darkgray; border-radius: 3px 4px; box-shadow: lightblue 10px 10px; margin: 8px; }
.product .title { font-size: 24px; } .product .picture { width: 150px; height: 150px; }
.product .price { font-size: 16px; text-align: right; }
The result
Your private SharePoint Online content
The Public web site

It is THAT simple! Cool , huh? Hope you appreciated this post, leave comments if you wish,
See you soon,
Yannick