

Hello SharePoint guys,
Today, my post is about something I find super interesting "How can we perform elevated tasks with a SharePoint Framework solution". You might have read my previous post talking about the user permissions context and JavaScript in SharePoint. In that post, I mentioned it is not possible to perform tasks that require more permissions that the current user has. However, in a SharePoint customization, we might need a WebPart to actually do more than what the current user is allowed to on his own.
To achieve this, we must delegate the required permission to an actor we can trust. A remote party that we, as developers, have full control on. In this post, I will show an Azure Function could totally be this actor. The solution does not require a lot a configuration and specific coding but some points are really important and must be understood. We will also see that with our super SharePoint PnP tool belt, we are fully equiped to face all the aspects of a SharePoint solution implementation.
Requirements and Design
Let's start with the requirements of our study case :
- We want a list dedicated to store the hardware requests from our users
- The regular users have read-only access to the requests list
- Though a custom SPFx Webpart, the users will be able to submit a new hardware request
The implementation and the technical considerations :
- We will provision the list using a PnP PowerShell script.
- We will implement a Client-Side WebPart using the SharePoint Framework. You will need a properly installed SPFx environment.
- We will use an Azure Function to act as a proxy for elevated-permissions tasks
- We will register a SharePoint app principal with enough permissions that will be used by the Azure Function
- The Azure Function will be used securely using Azure AD authentication
- The Azure Function must be within the Azure subscription related to the Office 365 tenant
- This solution is valid only with SharePoint Online (currently).
Provision the List
The Hardware Requests list will be a simple SharePoint List with the following fields:
- a Type choice field that allows to select the type of requested hardware
- a Quantity number field
- a Remark text field
- an Approved flag field (will not really be used in this post)
- a Rejected Reason text field (will not really be used in this post)
Let's write a small PowerShell script using PnP Powershell that will provision this list
$webUrl = "https://<tenant>.sharepoint.com/sites/<yoursite>"

If (Get-PnPContext) {} Else { Connect-PnPOnline $webUrl }

New-PnPList -Template GenericList -Title "Hardware Requests" -Url "HardwareRequests"

$hwList = Get-PnPList -Identity "Hardware Requests"

Add-PnPField -List $hwList -Type Choice -InternalName "HW_HardwareType" -DisplayName "Type" -AddToDefaultView -Required -Choices "Keyboard","Mouse","Display","Hard drive"
Add-PnPField -List $hwList -Type Number  -InternalName "HW_Quantity" -DisplayName "Quantity" -AddToDefaultView -Required
Add-PnPField -List $hwList -Type Note -InternalName "HW_Remark" -DisplayName "Remark" -AddToDefaultView -Required
Add-PnPField -List $hwList -Type Boolean -InternalName "HW_Approved" -DisplayName  "Approved" -AddToDefaultView
Add-PnPField -List $hwList -Type Note -InternalName "HW_RejectionReason" -DisplayName "Rejection Reason" -AddToDefaultView
Go to the List Settings interface, and remove all permissions from the lists. Now set read permissions for every users (and maybe higher permissions for your admin account if your are not site collection admin).
The SPFx WebPart
Let's create a new WebPart project with SharePoint Framework. Create a new folder for your project and type the classical yo @microsoft/sharepoint and select React as the JS framework
> md spfx-apponly
> cd spfx-apponly
> yo @microsoft/sharepoint
Let\'s create a new SharePoint solution. ? [ENTER]
What is your solution name? spfx-apponly ? [ENTER]
Which type of client-side component to create?
 WebPart
What is your WebPart name? (HelloWorld) HardwareRequestForm
What is your WebPart description? [ENTER]
Which framework would you like to use?
   No JavaScript framework
 > React
   Knockout
Go for a coffee, and in a few minutes come back and start implement our project. First of all, we will need to install the dependencies, the only one we need is actually the PnP JS Core library. In the terminal (still in your project folder), type npm install sp-pnp-js --save Under the src/ folder, create a new folder named model and create a new file IHardwareRequest.ts in it with the following content
export interface IHardwareRequest {
    title: string;
    type: string;
    quantity: number;
    remark: string;
    approved: boolean;
    rejectionReason: string;
}
Under the src/ folder, create a new folder named services and create a new file HardwareRequestService.ts in it with the following content.
import pnp, { Web, NodeFetchClient } from "sp-pnp-js";
import { IHardwareRequest } from "../model/IHardwareRequest";

const HardwareRequestListTitle = "Hardware Requests";

export class HardwareRequestService {

    private web: Web;

    constructor (web: Web) {
        this.web = web;
    }

    public static createAppOnly(siteUrl: string, clientId: string, clientSecret: string) : HardwareRequestService {
        pnp.setup({
            fetchClientFactory: () => {
                return new NodeFetchClient(siteUrl, clientId, clientSecret);
            }
        });

        return new HardwareRequestService(new Web(siteUrl));
    }

    public static createForCurrentWeb() : HardwareRequestService {
        return new HardwareRequestService(pnp.sp.web);
    }

    public submitRequest(request: IHardwareRequest) : Promise<any> {
        console.log(request);
        return this.web.lists.getByTitle(HardwareRequestListTitle).items.add({
            Title: request.title || ("Request " + new Date().toUTCString()),
            HW_HardwareType: request.type,
            HW_Remark: request.remark,
            HW_Quantity: request.quantity
        });
    }
}
In the class above, we actually create a method that will work in both client and server side. Just to make sure it actually works, we will test the service without the Azure Function directly in our WebPart. Let's go to the main WebPart class to configure the PnP library, in the HardwareRequestFormWebPart.ts file, add the following import and method:
import pnp from "sp-pnp-js";
//...
public onInit(): Promise<void> {

  return super.onInit().then(_ => {

    pnp.setup({
      spfxContext: this.context
    });

  });
}
Now let's implement the React component used by the WebPart, in the src/webparts/hardwareRequestForm/components/ folder, edit the HardwareRequestForm.tsx source file and put the following content
import * as React from 'react';
import styles from './HardwareRequestForm.module.scss';
import { IHardwareRequestFormProps } from './IHardwareRequestFormProps';
import { escape } from '@microsoft/sp-lodash-subset';

import { TextField, Dropdown, IDropdownOption, PrimaryButton } from "office-ui-fabric-react";
import { IHardwareRequest } from "../../../model/IHardwareRequest";
import { HardwareRequestService } from "../../../services/HardwareRequestService";

export default class HardwareRequestForm extends React.Component<IHardwareRequestFormProps, void> {

  private currentRequest: IHardwareRequest;

  constructor(props: IHardwareRequestFormProps) {
    super(props);
    this.currentRequest = {
      type: "",
      title: "",
      approved: false,
      quantity: 1,
      rejectionReason: "",
      remark: ""
    };
  }

  private submitRequest() {
    let service = HardwareRequestService.createForCurrentWeb();
    service.submitRequest(this.currentRequest);
  }

  public render(): React.ReactElement<IHardwareRequestFormProps> {
    return (
      <div className={styles.hardwareRequestForm}>
        <div className={styles.container}>
          <div className={`ms-Grid-row`}>
            <div className="ms-Grid-col ms-u-lg10 ms-u-xl8 ms-u-xlPush2 ms-u-lgPush1">
              <h2>Submit a new Hardware request</h2>
            </div>
          </div>
          <div className={`ms-Grid-row`}>
            <div className="ms-Grid-col ms-u-lg10 ms-u-xl8 ms-u-xlPush2 ms-u-lgPush1">
              <Dropdown label="Type" options={[
                { key: "Keyboard", text: "Keyboard" },
                { key: "Mouse", text: "Mouse" },
                { key: "Display", text: "Display" },
                { key: "Hard drive", text: "Hard drive" },
              ]} onChanged={v => this.currentRequest.type = v.key as string} />
            </div>
          </div>
          <div className={`ms-Grid-row`}>
            <div className="ms-Grid-col ms-u-lg10 ms-u-xl8 ms-u-xlPush2 ms-u-lgPush1">
              <TextField label="Quantity" onChanged={v => this.currentRequest.quantity = v} />
            </div>
          </div>
          <div className={`ms-Grid-row`}>
            <div className="ms-Grid-col ms-u-lg10 ms-u-xl8 ms-u-xlPush2 ms-u-lgPush1">
              <TextField multiline={true} rows={8} label="Remark" onChanged={v => this.currentRequest.remark = v} />
            </div>
          </div>
          <div className={`ms-Grid-row`}>
            <div className="ms-Grid-col ms-u-lg10 ms-u-xl8 ms-u-xlPush2 ms-u-lgPush1">
              <PrimaryButton text="Submit request" onClick={v => this.submitRequest()} />
            </div>
          </div>
          <div className={`ms-Grid-row`}>
            <div className="ms-Grid-col ms-u-lg10 ms-u-xl8 ms-u-xlPush2 ms-u-lgPush1">
            </div>
          </div>
        </div>
      </div>
    );
  }
}
At this step, the WebPart works properly if the user has enough permissions on the list. It performs the action directly from the browser JavaScript code. You can test it with your admin account (or any other privileged user).
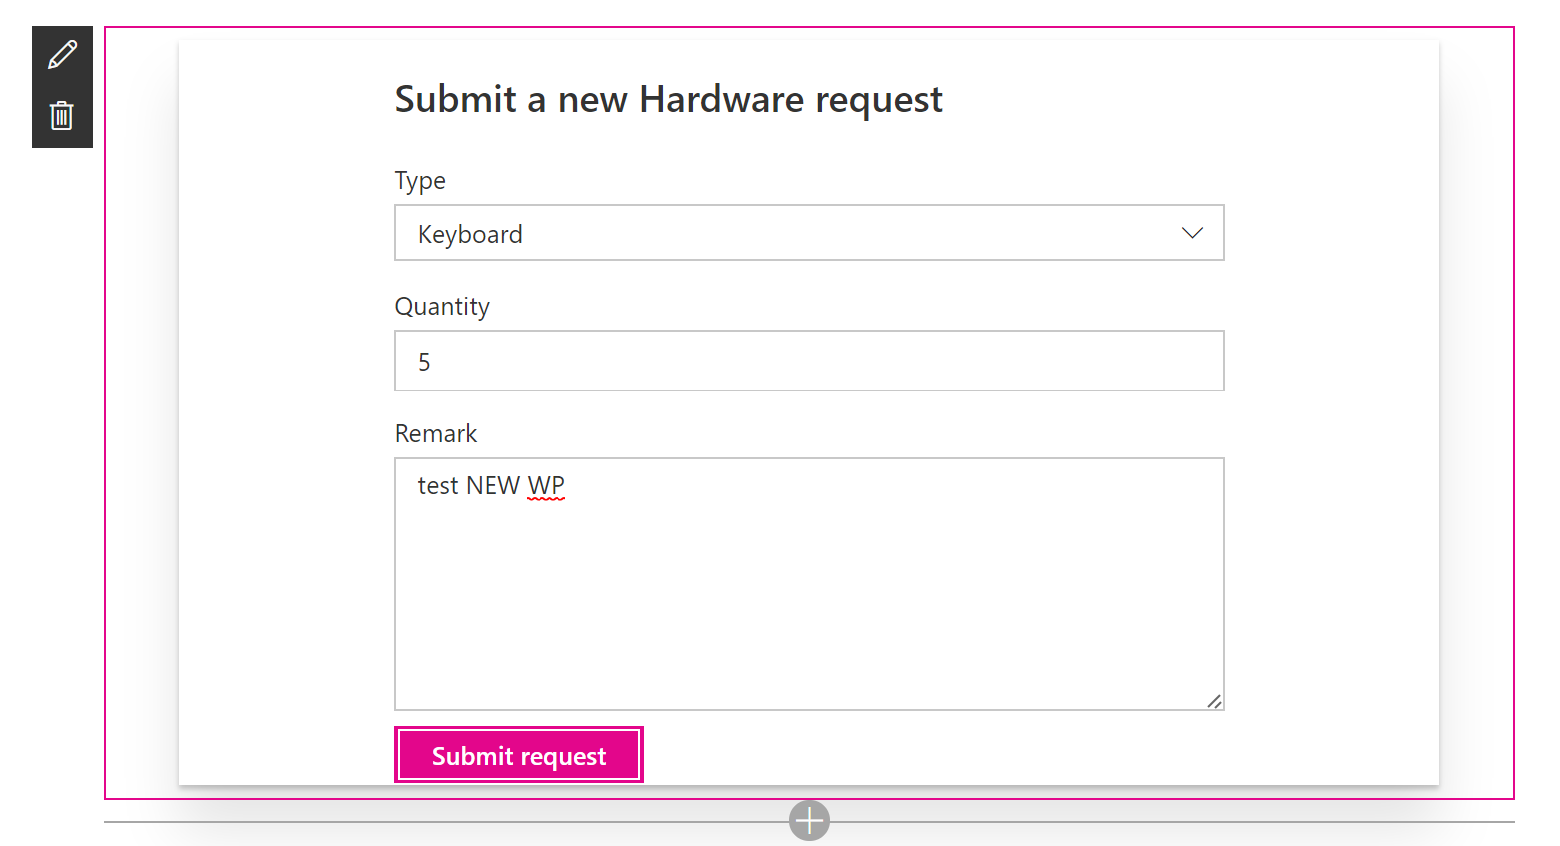
Fill in the fields, click Submit request and go check the list contains now your item


If you try to test the WebPart with a user that has read-only access instead, it won't do anything and display an error message in the console.
Leverage App-Only
As you probably understood now, we will create an Azure Function that will perform the task in App-Only mode. To achieve that, we obviously need to register a new app on our SharePoint Online.
Go to https://
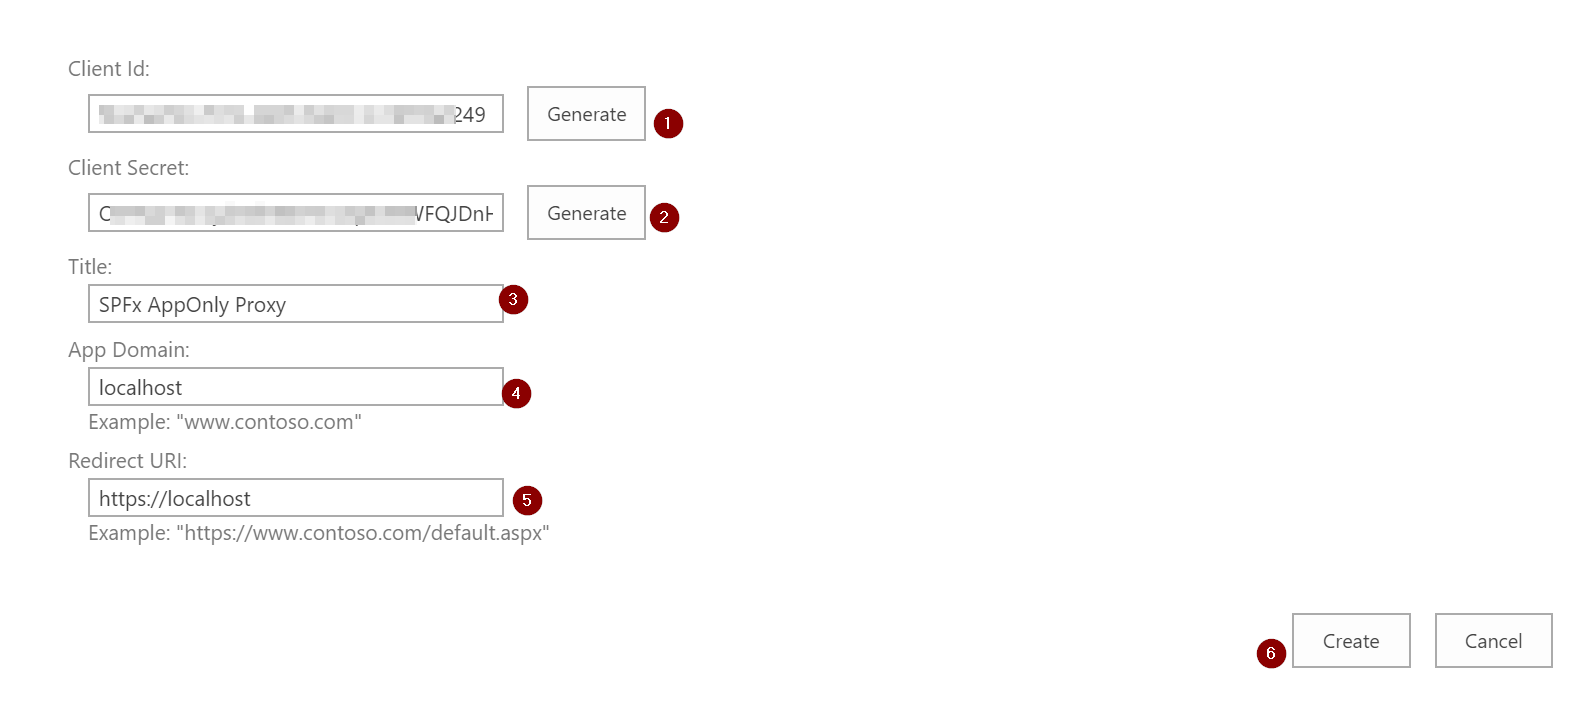
- Generate the Client Id
- Generate the Client Secret
- Enter the title
- Enter a domain
- Enter a Redirect URI
- Click Create
Actually, the values for title, domain and redirect URI don't really matter but they are required for the app principal to be created. Keep the Client Id and Client Secret in a safe location, we will need them later on

Now that our SharePoint app principal is created, we need to give it the required permissions to perform the task. Go to https://_

- Copy/Paste your newly created app Client Id
- Click "Lookup"
- Copy/Paste the following XML in the Permission Request XML field
<AppPermissionRequests AllowAppOnlyPolicy="true">
  <AppPermissionRequest Scope="http://sharepoint/content/sitecollection/web/list" Right="Write" />
</AppPermissionRequests>
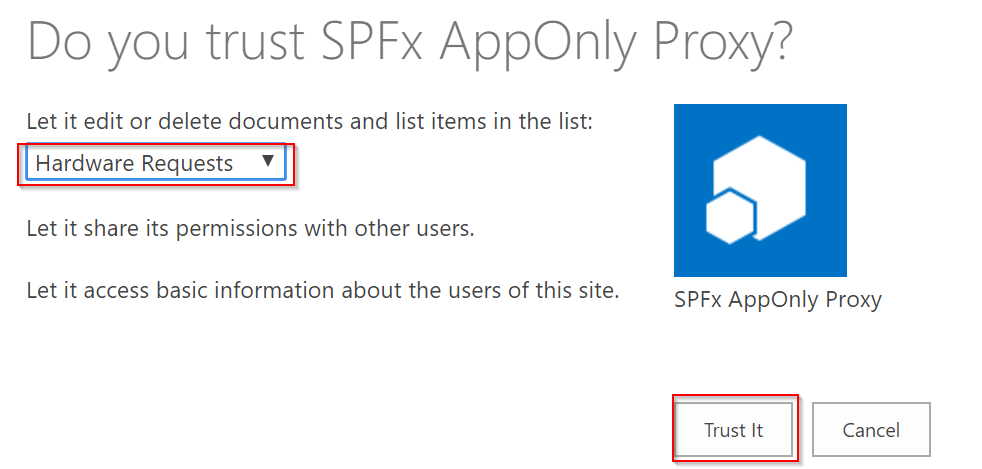
Select our Hardware Requests list and click Trust it
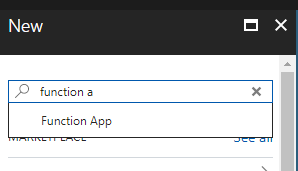
Let's create the Azure Function
Go to https://portal.azure.com and log in with your tenant admin account. Create a new Function App, select your subscription and location preferences.
When done, go to your new Function App. We can already configure our Function App for authentication and CORS settings
Configure authentication


Choose the Express configuration and create the App registration automatically, click OK

Click the CORS link in settings

and add your tenant address as an allowed origin

Now that the Function App is properly configured, let's create our Function


Select a name and "Anonymous" as the Authorization level. The code of our Azure Function will make use of the service class we wrote earlier. This service class depends on the PnP JS Core library, so we need to install this dependency in the Azure Function. To do this, there is a small procedure to follow :
- Somewhere on your computer, create a file named package.json containing the following:
{
  "dependencies": {
    "sp-pnp-js": "^2.0.6",
    "node-fetch":"1.7.1"
  }
}
- Go to https://.scm.azurewebsites.net
- On Debug console in the top bar, select CMD
- navigate to D:\home\site\wwwroot
- Drag and drop the package.json file in the file explorer table
- Type npm install in the Kudu console
We are now ready to implement our Azure Function. Switch back to the Function editor window and replace the content by :
module.exports = function (context, req) {

    context.log('Sending app-only request to Hardware Requests list.');

    var siteUrl = "https://<yourtenant>.sharepoint.com/sites/<yoursite>";
    var clientId = "<your client id>";
    var clientSecret = "<your client secret>";

    // Instantiate the service in app-only
    var service = HardwareRequestService.createAppOnly(siteUrl, clientId, clientSecret);

    // The body is the request to create
    var request = req.body && JSON.parse(req.body);

    context.log(request);

    if (!request || !request.type) {
        context.res = {
            headers: {
                "Content-Type": "application/json",
                "Access-Control-Allow-Credentials": "true",
                "Access-Control-Allow-Origin": "https://<tenant>.sharepoint.com",
                "Access-Control-Allow-Methods": "GET, POST, OPTIONS",
                "Access-Control-Allow-Headers": "Content-Type, Set-Cookie",
                "Access-Control-Max-Age": "86400"
            },

            body: { status: "Properly authenticated" }
        };

        context.log("No BODY");
        context.log(context.res);
        context.done();
        return;
    }

    context.log("BODY available, submitting the request");
    // Submit the request
    service.submitRequest(request)
        .then(function () {
            context.log("Request successfully submitted");
            context.res = {
                headers: {
                    "Content-Type": "application/json",
                    "Access-Control-Allow-Credentials": "true",
                    "Access-Control-Allow-Origin": "https://<tenant>.sharepoint.com",
                    "Access-Control-Allow-Methods": "GET, POST, OPTIONS",
                    "Access-Control-Allow-Headers": "Content-Type, Set-Cookie",
                    "Access-Control-Max-Age": "86400"
                },

                body: { status: "succeeded" }
            };
            context.log(context.res);
            context.done();
        }).catch(function (error) {
            context.log(error);
            context.log("Request cannot be submitter");
            context.res = {
                headers: {
                    "Content-Type": "application/json",
                    "Access-Control-Allow-Credentials": "true",
                    "Access-Control-Allow-Origin": "https://<tenant>.sharepoint.com",
                    "Access-Control-Allow-Methods": "GET, POST, OPTIONS",
                    "Access-Control-Allow-Headers": "Content-Type, Set-Cookie",
                    "Access-Control-Max-Age": "86400"
                },
                status: 400,
                body: { status: "failed" }
            };

            context.log(context.res);
            context.done();
        });
};
Adapt your own SharePoint Url and App credentials. We also need to use the service class we created earlier. Unfortunatly, Azure Function do not support TypeScript yet. Don't worry, there is an easy way to get our class code, in your SPFx solution, go to lib/services folder, you will see the HardwareRequestService.js file which is the transpiled version of your class in plain Javascript, copy the lines from 3 to 30 (the other ones are useless) and paste them before the code of our Azure Function. Click the Save button.
Call our Proxy from the SPFx WebPart
Now that our Azure Function is implemented, we need to call it from our WebPart. To do that, we will create a new service class that will issue a simple HTTP call the the Azure Function. In the services/ folder, create a new file named HardwareRequestProxyService.ts and copy the following content in it
import { IHardwareRequest } from "../model/IHardwareRequest";
import { HttpClient, HttpClientConfiguration, IHttpClientOptions, HttpClientResponse } from "@microsoft/sp-http";

// Replace these constants by your own azure function URL
export const AzureFunctionUrl = "https://your-func.azurewebsites.net/api/AddHardwareRequest";
export const AzureFunctionSiteUrl = "https://your-func.azurewebsites.net";

export class HardwareRequestProxyService {

    constructor(private httpClient: HttpClient) {

    }

    public submitRequest(request: IHardwareRequest): Promise<HttpClientResponse> {
        return this.httpClient.post(AzureFunctionUrl, HttpClient.configurations.v1, {
            credentials: "include",
            mode: "cors",
            body: JSON.stringify(request)
        });
    }
}
We have now a class that will issue a HTTP POST Request to our Azure Function with a Hardware request object as the body, it is configured to include the credentials, which means that it will use the SharePoint Online authentication cookie to authenticate against Azure AD. Since the regular AAD application authentication flow uses a login page that redirect afterwards to your application, it is not really suitable with a WebPart scenario. We have then to work this around. Thanks to Vesa Juvonen and Waldek Mastykarz PnP Webcast here, we know there is a handy way to achieve this using a hidden Iframe. Let's adapt our component. First we need to give it a new property that will be the SPFx Http Client it will pass to the service object. Go to the IHardwareRequestFormProps.ts file and change the content to
import { HttpClient } from "@microsoft/sp-http";

export interface IHardwareRequestFormProps {
  description: string;
  httpClient: HttpClient;
}
You will then have to adapt the code of the main WebPart class HardwareRequestFormWebPart.ts, replace the declaration of the const element by
const element: React.ReactElement<IHardwareRequestFormProps > = React.createElement(
      HardwareRequestForm,
      {
        description: this.properties.description,
        httpClient: this.context.httpClient
      }
    );
Last but not least, we have now to adapt the React component to call our service but also handle the AAD authentication using that hidden IFrame in the HardwareRequestForm.tsx, add the following import
//...
import { HardwareRequestProxyService,AzureFunctionSiteUrl } from "../../../services/HardwareRequestProxyService";
//...
replace the submitRequest() method by
//...
private executeOrDelayUntilAuthenticated(action: Function): void {
    if (this.authenticated) {
      action();
    } else {
      setTimeout(() => {
        this.executeOrDelayUntilAuthenticated(action);
      }, 1000);
    }
  }

  private submitRequest() {
    this.executeOrDelayUntilAuthenticated(() => {
      let service = new HardwareRequestProxyService(this.props.httpClient);
      service.submitRequest(this.currentRequest);
    });

  }
//...
This will ensure the "authenticated" flag is set before calling the Azure Function In the render method, add the iframe somewhere in the render result.
public render(): React.ReactElement<IHardwareRequestFormProps> {
    return (
      <div className={styles.hardwareRequestForm}>
        <div className={styles.container}>
          <iframe src={AzureFunctionSiteUrl} style={{ display: "none" }} onLoad={() => this.authenticated = true} />
          <div className={`ms-Grid-row`}>
            <div className="ms-Grid-col ms-u-lg10 ms-u-xl8 ms-u-xlPush2 ms-u-lgPush1">
              <h2>Submit a new Hardware request</h2>
    // ... omitted for brevity
Make sure the onLoad event handler is present, it is very important.
The Azure AD Application user consent
In a typical Azure Active Directory application, the user has to consent certain privileges to the application. In our case, we use a registered AD application only as an authentication mechanism. We don't really care about the granted permissions. Moreover, we use a hidden WebPart with the SharePoint Online authentication cookie, The user will never even see the page. But, by default, The user will never be redirected to our Azure Function without having given his consent. We than need to force this consent, Only an administrator can do that ! If you are not the AD tenant administrator, It's time to become his best friend or just ask him kindly to click on the Accept button of a given URL. To achieve this, go to your Azure Function URL with an account that has not already consented the permissions rights. You should be redirected to this kind of page (sorry for the french):

In your browser address bar, append the following to the current URL : &prompt=admin_consent and reach this new URL (or give it to the AD admin), you will now see a page slightly different

This time the page reads (in French) "You are logged in as you@tenant.onmicrosoft.com (Administrator)" and a few lines below, something like "The user will not be prompted".
That way, the administrator can consent the permissions for every users. In our case, since the user is authenticated on SharePoint Online, he will be directly redirected to our Azure Function.
Special Thanks to Waldek Mastykarz and his article here for helping me to solve this challenge.
And we're done!
Here you go, you can test your WebPart with a user who doesn't have write access on the list to make sure your solution works properly.
However, I still encounter an issue I hope I could solve some day.
Even if the Azure Function returns a 200 status code and it works properly. It seems that the headers are not properly sent and the SPFx HttpClient is not happy with it. The HTTP call is then considered as failed.
Leverage an Azure Function with App-Only to enhance SPFx capabilities
In this post, we then have seen how we can leverage App-Only mode from Azure Functions to perform tasks a user is not allowed to.. We also have seen how to securely call an Azure Function from SPFx You can find the complete project solution on my GitHub repo here in two branches :
- The branch without the Azure Function implementation
- The branch with the Azure Function implementation
Hope you liked this post and see you soon !
Yannick