
Hi SharePoint fellows,
In this post, I would like to demonstrate how easy it is to implement a really engaging and modern user experience in a SharePoint Framework client-side WebPart.
The requirements
The purpose of the WebPart is to present a Kanban Board view of a configured list. The user will be able to change the items from a status to another using drag-and-drop.
- The source list will be configured through the WebPart properties.
- The statuses are the choices of a ChoiceField in the list.
- The status ChoiceField to use will also be configured through the WebPart properties.
Implementation
- The UI will dynamically generate a column for each status in which each task will be contained in a tile.
- We will leverage the natively supported Office UI Fabric CSS framework that will make our UI fully responsive and in line with the SharePoint modern look and feel.
- For the drag-and-drop capability, we will use the popular jQuery UI library.
- For manipulating the SharePoint data, we will use the sp-pnp-js library.
This will be a very simplistic and, I would roughly say, "quick and dirty" implementation. The purpose here is to focus on possibilities and ease offered by SPFx. You will see it is possible to build a real engaging WebPart with SPFx within 2 hours (1 hour for developping, 1 hour for CSS fine tuning ;) )*.
(* Obviously, for a real clean and scalable project, we would prefer a robust implementation with a well defined project structure, separation of concerns,...)
Let's code !
- Create a folder named kanban-webpart-demo/
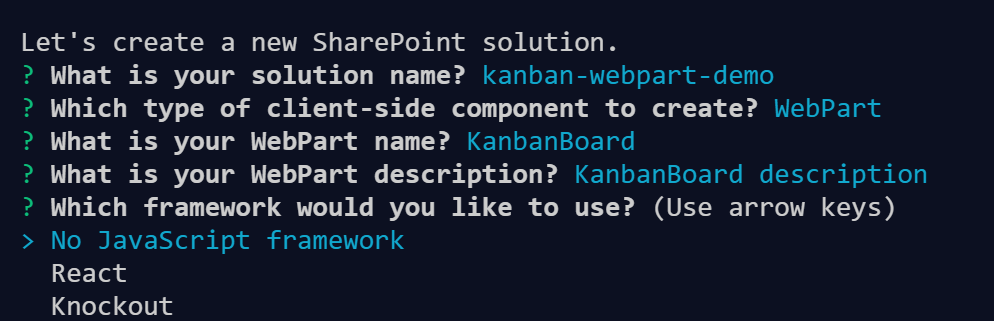
- open it from a console, type the famous yo @microsoft/sharepoint and enter the values as following
When the scaffolding process is finished, let's first install the required packages. In the console, type the following command:
> npm install jquery jquery-ui sp-pnp-js --save
The model
This Kanban Board will display and manage task items, we will then declare an interface with the relevant properties for us. In the kanbanBoard/ folder, let's create a models/ folder that will contain a ITask.ts file.
export interface ITask {
  Id: number;
  Title: string;
  Status: string;
}
In a first step, we will use hard coded fake data. In the beginning of our WebPart class, let's add the collection of groups and the collection of tasks.
export default class KanbanBoardWebPart extends BaseClientSideWebPart<IKanbanBoardWebPartProps> {
// ....
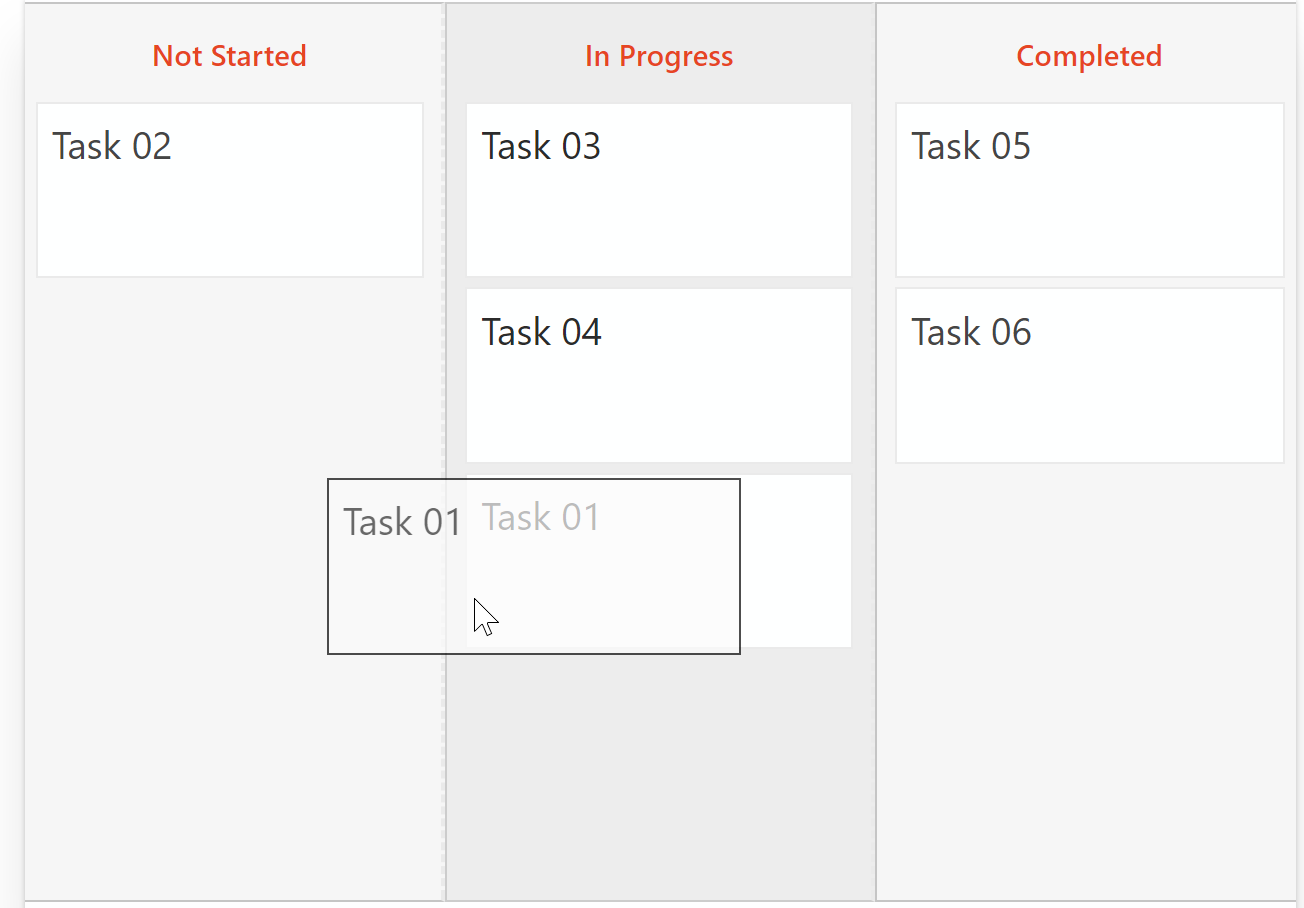
private statuses: string[] = ["Not Started", "In Progress", "Completed"];
private tasks: ITask[] = [
{
Id: 1,
Status: "Not Started",
Title: "Task 01"
},
{
Id: 2,
Status: "Not Started",
Title: "Task 02"
},
{
Id: 3,
Status: "In Progress",
Title: "Task 03"
},
{
Id: 4,
Status: "In Progress",
Title: "Task 04"
},
{
Id: 5,
Status: "Completed",
Title: "Task 05"
},
{
Id: 6,
Status: "Completed",
Title: "Task 06"
}
];
// ...
}
The User Interface
We create now a private _renderBoard() method that will generate the dynamic HTML and stick it into the WebPart. This method will use a _getColumnSizeClassName() helper method that returns the appropriate Office UI CSS class name according to the number of columns to display. In the KanbanBoardWebPart class, bring the following changes. The render() method must also call our new _renderBoard() method
// ....
export const LAYOUT_MAX_COLUMNS = 12;

export default class KanbanBoardWebPart extends BaseClientSideWebPart<IKanbanBoardWebPartProps> {

  // ....

  public render(): void {
    this._renderBoard();
  }

  private _getColumnSizeClassName(columnsCount: number): string {
    if (columnsCount < 1) {
      console.log("Invalid number of columns");
      return "";
    }

    if (columnsCount > LAYOUT_MAX_COLUMNS) {
      console.log("Too many columns for responsive UI");
      return "";
    }

    let columnSize = Math.floor(LAYOUT_MAX_COLUMNS / columnsCount);

    console.log("Column size =" + columnSize);
    return "ms-u-sm" + (columnSize || 1);
  }

 /**
   * Generates and inject the HTML of the Kanban Board
   */
  private _renderBoard(): void {
    let columnSizeClass = this._getColumnSizeClassName(this.statuses.length);

    // The begininning of the WebPart
    let html = `
      <div class="${styles.kanbanBoard}">
        <div class="${styles.container}">
          <div class="ms-Grid-row ${styles.row}">`;

    // For each status
    this.statuses.forEach(status => {
      // Append a new Office UI Fabric column with the appropriate width to the row
      html += `<div class="${styles.kanbanColumn} ms-Grid-col ${columnSizeClass}" data-status="${status}">
                  <h3 class="ms-fontColor-themePrimary">${status}</h3>`;
      // Get all the tasks in the current status
      let currentGroupTasks = this.tasks.filter(t => t.Status == status);
      // Add a new tile for each task in the current column
      currentGroupTasks.forEach(task => {
        html += `<div class="${styles.task}" data-taskid="${task.Id}">
                        <div class="ms-fontSize-xl">${task.Title}</div>
                      </div>`;
      });
      // Close the column element
      html += `</div>`;
    });

    // Ends the WebPart HTML
    html += `</div>
        </div>
      </div>`;

    // Apply the generated HTML to the WebPart DOM element
    this.domElement.innerHTML = html;

    console.log("Kanban columns found : " + $(".kanban-column").length);
   // Make the kanbanColumn elements droppable areas
    let webpart = this;
    $(`.${styles.kanbanColumn}`).droppable({
      tolerance: "intersect",
      accept: `.${styles.task}`,
      activeClass: "ui-state-default",
      hoverClass: "ui-state-hover",
      drop: (event, ui) => {
        // Here the code to execute whenever an element is dropped into a column
        let taskItem = $(ui.draggable);
        let source = taskItem.parent();
        let previousStatus = source.data("status");
        let taskId = taskItem.data("taskid");
        let target = $(event.target);
        let newStatus = target.data("status");
        taskItem.appendTo(target);

        // If the status has changed, apply the changes
        if (previousStatus != newStatus) {
          webpart.changeTaskStatus(taskId, newStatus);
        }
      }
    });

    console.log("Task items found : " + $(".task").length);
    // Make the task items draggable
    $(`.${styles.task}`).draggable({
      classes: {
        "ui-draggable-dragging": styles.dragging
      },
      opacity: 0.7,
      helper: "clone",
      cursor: "move",
      revert: "invalid"
    });
  }

  private changeTaskStatus(taskId: number, newGroup: string) {
    console.log(`Task ${taskId} moved to group ${newGroup}`);
  }

  // ....
}
We need now to add some CSS for our custom elements, let's replace the content of the KanbanBoard.module.scss file with the following
.kanbanBoard {
  .container {
    max-width: 700px;
    margin: 0px auto;
    box-shadow: 0 2px 4px 0 rgba(0, 0, 0, 0.2), 0 25px 50px 0 rgba(0, 0, 0, 0.1);
    position: relative;
    background-color: #FEFEFF;
    padding: 3px;
    min-height: 500px;
    overflow-y: auto;
    overflow-x: hidden;
  }

  .row {
    display: flex;
  }

.kanbanColumn {
  vertical-align: top;
  min-height: 500px;

  h3 {
    text-align: center;
  }
}

.kanbanColumn:not(:last-child) {
  border-right: 2px dashed #eaeaea;
}

.task {
  position: relative;
  padding: 8px;
  width: 90%;
  margin: auto;
  margin-bottom: 5px;
  background-color: #FEFFFF;
  border: 1px solid #eaeaea;
  min-height: 80px;

  div {
    cursor: default;
  }

  span {
    cursor: default;
  }

  .taskName {
  font-weight: bold;
  font-size: 18px;
  display: block;
  }
}

 .task.dragging {
      background-color: #FBFBFB;
      border: 1px solid black;
      z-index: 50;
  }

.task:hover {
  border-width: 3px;
  border: 1px solid blue;
}

}
To have full features of the jQuery UI drag-and-drop, we also need to include some jQuery CSS. (you can also consider customizing it by yourself). In order to achieve that, we have to load the CSS dynamically using the SPComponentLoader. We will take the CSS file from the jQuery CDN Make the following changes in the KanbanBoardWebPart.ts file
// ...
import { SPComponentLoader } from '@microsoft/sp-loader';
// ...
export default class KanbanBoardWebPart extends BaseClientSideWebPart<IKanbanBoardWebPartProps> {
// ...
  constructor() {
    super();
    SPComponentLoader.loadCss('https://code.jquery.com/ui/1.12.1/themes/base/jquery-ui.min.css');
  }
// ...
}
We can now test our WebPart in the local Workbench with the hardcoded fake data, enter the gulp serve command in the console and let's check the WebPart behaves as expected. You should see something similar to the figure below. Try to drag and drop task tiles from a column to another to verify everything works fine.

The REAL model (SharePoint data)
Now that the UI is what we expect, we have to integrate it with real SharePoint data. As stated above, the data will come from a configured list and the Status field must be configurable as well. We will then have to play with not only Tasks but also Lists and Fields, create two new files under the models/ folder
export interface IFieldInfo {
  Title: string;
  InternalName: string;
  TypeAsString: string;
  Choices?: string[];
}
and
import { IFieldInfo } from "./IFieldInfo";

export interface IListInfo {
    Id: string;
    Title: string;
    Fields: IFieldInfo[];
}
Let's now define the properties we need for our WebPart to be configurable, update the content of IKanbanBoardWebPartProps.ts with
export interface IKanbanBoardWebPartProps {
  tasksListId: string;
  statusFieldName: string;
}
We can also configure the default values for these settings in the KanbanBoardWebPart.manifest.json file. Set the following as the value of the properties in the preconfiguredEntries section.
{
  "tasksListId" : "",_
  "statusFieldName": "Status"
}
Back to the KanbanBoardWebPart.ts file, adapt the class as the following for the settings to be configurable from the Property Pane.
// ...
import {
  BaseClientSideWebPart,
  IPropertyPaneConfiguration,
  PropertyPaneTextField,
  PropertyPaneDropdown
} from '@microsoft/sp-webpart-base';
import { escape } from '@microsoft/sp-lodash-subset';
// ...

import { ITask } from "./models/ITask";
import { IListInfo } from "./models/IListInfo";
import { IFieldInfo } from "./models/IFieldInfo";
// ...
export default class KanbanBoardWebPart extends BaseClientSideWebPart<IKanbanBoardWebPartProps> {

  private statuses: string[] = [];
  private tasks: ITask[] = [];
  private availableLists: IListInfo[] = [];
  // ...
  private _getAvailableFieldsFromCurrentList(): IFieldInfo[] {
    if (!this.properties.tasksListId)
      return [];

    let filteredListInfo = this.availableLists.filter(l => l.Id == this.properties.tasksListId);
    if (filteredListInfo.length != 1)
      return [];

    return filteredListInfo[0].Fields.filter(f => f.TypeAsString == "Choice");
  }

  protected getPropertyPaneConfiguration(): IPropertyPaneConfiguration {
    return {
      pages: [
        {
          header: {
            description: "Settings"
          },
          groups: [
            {
              groupName: "Tasks source configuration",
              groupFields: [
                PropertyPaneDropdown('tasksListId', {
                  label: "Source Task list",
                  options: this.availableLists.map(l => ({
                    key: l.Id,
                    text: l.Title
                  }))
                }),
                PropertyPaneDropdown('statusFieldName', {
                  label: "Status field Internal name",
                  options: this._getAvailableFieldsFromCurrentList().map(f => ({
                    key: f.InternalName,
                    text: f.Title
                  }))
                })
              ]
            }
          ]
        }
      ]
    };
  }
}
Read and Write data to SharePoint with the PnP JS Core library
In order to fetch and update data from and to SharePoint, we will need to call the REST API; we are totally able to do it with the native SPFx SPHttpClient class but the main issue with this one is that we have to build manually the URL string which, in many cases, leads to issues (from simple typos to badly generated strings in more complex scenarios).
Plus you have to know the exact syntax, spend time on Google, in the Reference Docs instead of coding each time you need a new thing.
In order to limit these issues and to improve your productivity, you can use the PnP JS Core library. It will build the REST URLs in the correct syntax for you and will tell you what's available with the intellisense in your IDE (thanks to TypeScript definition files).
Let's write our data manipulation methods, adapt the KanbanBoardWebPart.ts file like this:
// ...
import pnp from "sp-pnp-js";
// ...
export default class KanbanBoardWebPart extends BaseClientSideWebPart<IKanbanBoardWebPartProps> {
  // ...
  public onInit(): Promise<any> {
    return super.onInit().then(_ => {
      // Configure PnP Js for working seamlessly with SPFx
      pnp.setup({
        spfxContext: this.context
      });
    })
      // Load the available lists in the current site
      .then(() => this._loadAvailableLists())
      .then((lists: IListInfo[]) => this.availableLists = lists);
  }

  private _loadAvailableLists(): Promise<IListInfo[]> {
       return pnp.sp.web.lists.expand("Fields").select("Id", "Title", "Fields/Title", "Fields/InternalName", "Fields/TypeAsString").get();
  }

  private _loadTasks(): Promise<ITask[]> {
    return pnp.sp.web.lists.getById(this.properties.tasksListId).items.select("Id", "Title", this.properties.statusFieldName).get()
      .then((results: ITask[]) => results && results.map(t => ({
        Id: t.Id,
        Title: t.Title,
        Status: t[this.properties.statusFieldName]
      })));
  }

  private _loadStatuses(): Promise<string[]> {
    console.log("Load statuses...");
    return pnp.sp.web.lists.getById(this.properties.tasksListId).fields.getByInternalNameOrTitle(this.properties.statusFieldName).get()
      .then((fieldInfo: IFieldInfo) => fieldInfo.Choices || []);
  }

  public render(): void {
    // Only if properly configured
    if (this.properties.statusFieldName && this.properties.tasksListId) {
      // Load the data
      this._loadStatuses()
        .then((statuses: string[]) => this.statuses = statuses)
        .then(() => this._loadTasks())
        .then((tasks: ITask[]) => this.tasks = tasks)
        // And then render
        .then(() => this._renderBoard())
        .catch(error => {
          console.log(error);
          console.log("An error occured while loading data...");
        });
    } else {
      this.domElement.innerHTML = "<div>Please configure the WebPart</div>";
    }
  }
 // ...
  private changeTaskStatus(taskId: number, newStatus: string) {
    // Set the value for the configured "status" field
    let fieldsToUpdate = {};
    fieldsToUpdate[this.properties.statusFieldName] = newStatus;

    // Update the property on the list item
    pnp.sp.web.lists.getById(this.properties.tasksListId).items.getById(taskId).update(fieldsToUpdate);
  }
// ...
}
We can now test our WebPart against a real SharePoint site.
First of all, we need to create our source SharePoint list. Go to your SharePoint site, create a standard task list and create some tasks in it.
Run the gulp serve command and go to https://
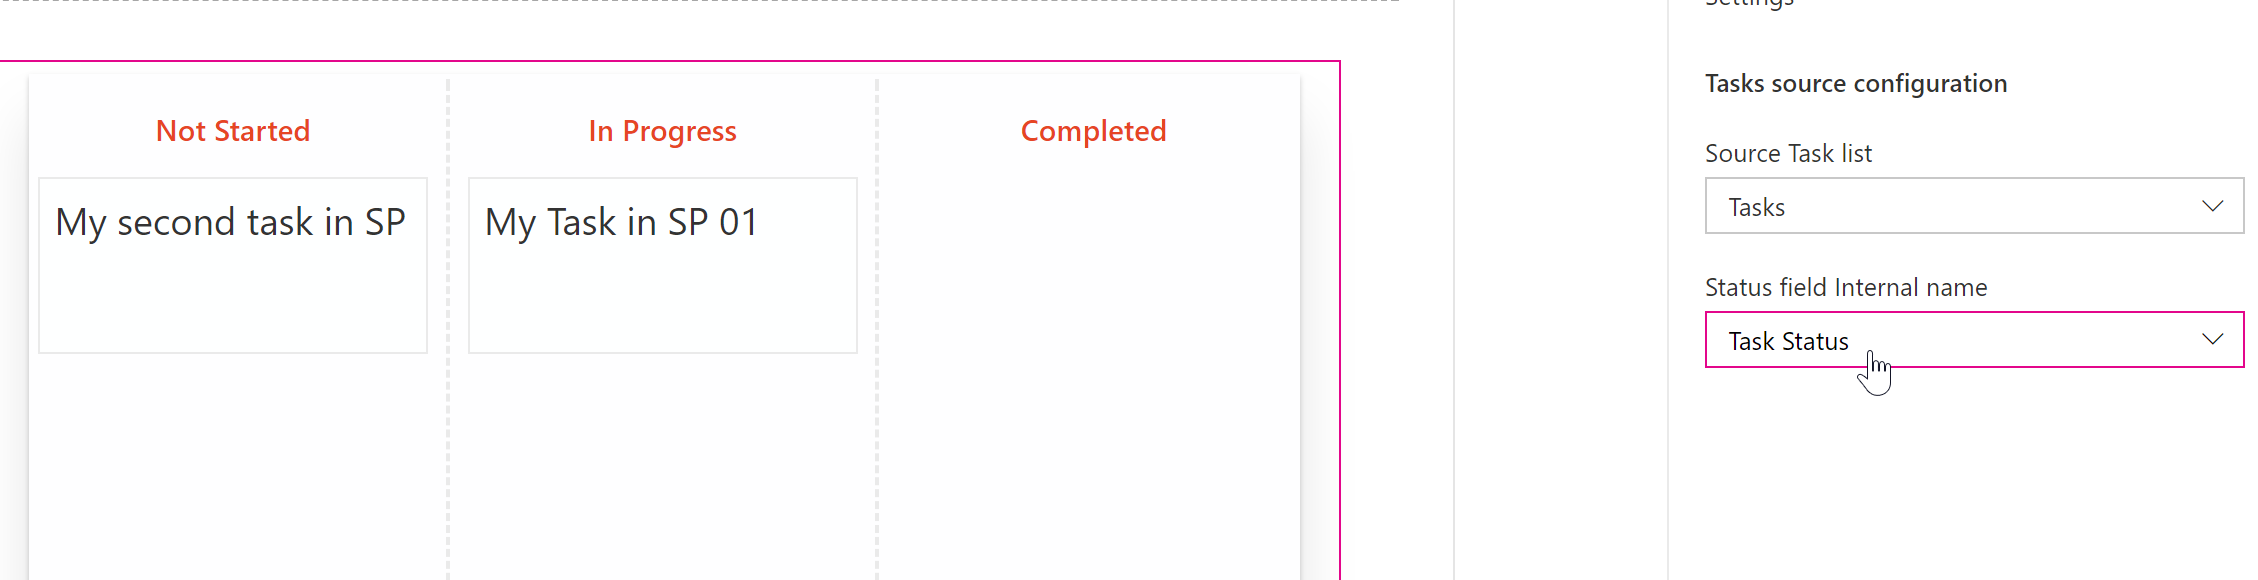
On the SharePoint hosted Workbench, add your WebPart. you will be asked to configure it.

- Select the Task list you have just created.
- Select the field you want to use for grouping (e.g. "Task Status")
And see it magically updating :
Let's first verify the data is correct

Move a task from a column to another and check the data is properly updated in the list


YEAAAAH It works ! What..? Did you doubt?
Let's now verify it is really dynamic and responsive. Go to your Tasks list settings and modifiy the available values in the Task Status field.

Let's refresh our Workbench:

(* Since we are using Office UI Fabric that has a Responsive Grid based on 12 columns, and I wanted my columns to be equal in width, in the case of 5 columns, the size of a column is 12 / 5 = 2 as whole number, it is why we can see a blank space on the right)
Conclusion
In this post, we saw how to implement an engaging and easy to configure WebPart with SharePoint Framework. This implementation is not perfect in terms of code and project structure (and maybe not optimized since all the lists are loaded on startup). It is actually on purpose because I want to demonstrate in a upcoming post how we can write reusable, scalable and beautiful code with SPFx. You can get the entire solution on my github repo
I hope you liked it, give your feedback !
See you soon,
Yannick