
Hi Microsoft 365 devs !
In this post, let's discover together how to develop a client side Blazor app manipulating Microsoft 365 data using the preview version of the new PnP Core SDK.
PnP Core SDK
If you follow a bit what's happening in the SharePoint and Microsoft 365 Universe, you probably have heard about the PnP initiative. A community driven open-source effort to share experiences and help folks with documentation, guidance, tools and libraries.
A few months ago, Bert Jansen and Paolo Pialorsi have started the development of a brand new library fully implemented in .NET Core that is designed to work against the broader Microsoft 365 suite (SharePoint Online and other products such as Microsoft Teams, Planner, etc...) in modern .NET apps. It is built as "Graph First", it means, it will leverage the Microsoft Graph API whenever possible, when not, it will fall back to the SharePoint REST API to fill gaps when working against SharePoint Online.
Being implemented fully in .NET Core means that it is fully compatible with all modern .NET applications, working cross platforms, for instance:
- Windows
- Linux
- Mac OS
- Asp.NET Core
- Azure Functions v3
- Blazor
- Xamarin
- ...
IMPORTANT This library is still currently in preview. It means it is not recommended for production usage. It can still have undiscovered bugs and will most likely have breaking changes in future releases. We encourage everyone of you to give it a try and provide feedback so we can improve it and try make it suitable for your scenarios and usages. This blog post aims to give you an overview of some current capabilities of this new SDK
Bert and Paolo really achieved outstanding work building solid foundations of the library (those guys are really development wizards!). That makes it quite easy to add more and more features to the SDK. It also aims to be really easy from user code perpsective!
I have humbly contributed since the very beginning of this project. Brilliant guys like Paul Bullock and Jarbas Horst joined the effort too, and we are looking for more contributors to make this library mature enough soon. If you are interested in helping us, please check out the repository here!
Blazor
Blazor is a new technology introduced by Microsoft. It relies on .NET Core and allows to develop modern web applications in C#. By modern, I mean applications pretty much in line with the trends of the industry lead by technologies like React, Angular or Vue (and others...). Those technologies are mainly client side and are executed in the client browser. It means, they are built in JavaScript! It has the major advantage that applications are very dynamic and user friendly, they allowed developers to reach an almost full parity with native apps from a user experience perspective.
Blazor exists in two flavors;
- Blazor Server App that runs .NET code on the server and trigger real time changes to the DOM of the client web page, under the hood, it relies on SignalR to forward the real time changes between the server and client. It has been around for about 1 year.
- Blazor WebAssembly that runs .NET code directly in the browser leveraging WebAssembly. A .NET CLR is implemented in WebAssembly and thus is able to run .NET code in DLLs sent to the client browser. It was released recently at Build in May 2020
Writing C# in client applications
Blazor is not the first technology that allows writing C# in client web applications.
Remember Silverlight ? It was quite similar to Adobe Flash, and allowed running .NET code in browser applications using a plugin. Unfortunately, it was discontinued quite early, and I know that Microsoft developers have been frustrated by that change in the strategy. Definitely, I am convinced it was the right move! The need for an external plugin was not a viable way in the world of mobile, multi devices, and multi OS that had emerged. JavaScript and its myriad of framework have then become the only way to go to do web client side development.
Today, however, a new standard is emerging: WebAssembly. It is implemented in the recent major browsers and allows to execute some low level code directly in the browser environement without the need of any external plugin. It means that it is the portable way the current web industry deserves! It is one of the reasons, in my humble opinion, that might make Blazor a future-proof and long lasting technology! But well, only future will tell!
Let's give it a try!
In this post, let's see together how we can build a Blazor WebAssembly app (fully running in the browser). In order to do so, we will need .NET Core v3.1. I will be using Visual Studio Code as my editor.
NOTE: It can also be done with Visual Studio 2019 v16.6.3+, but, at the time of this writing, the wizard doesn't allow to enable authentication just yet, these steps would then be manual (see the official guidance here).
Let's use VS Code and the .NET Core CLI in this post. You will also need the necessary privileges to be able to register a new AAD application.
Register an Azure Active Directory App
In order to authenticate to be able to work on the resources we will use (meaning Microsoft Graph and SharePoint Online), we need to register an application in Azure Active Directory.
Let's go to the AAD portal. In the App Registrations section, click New Application.
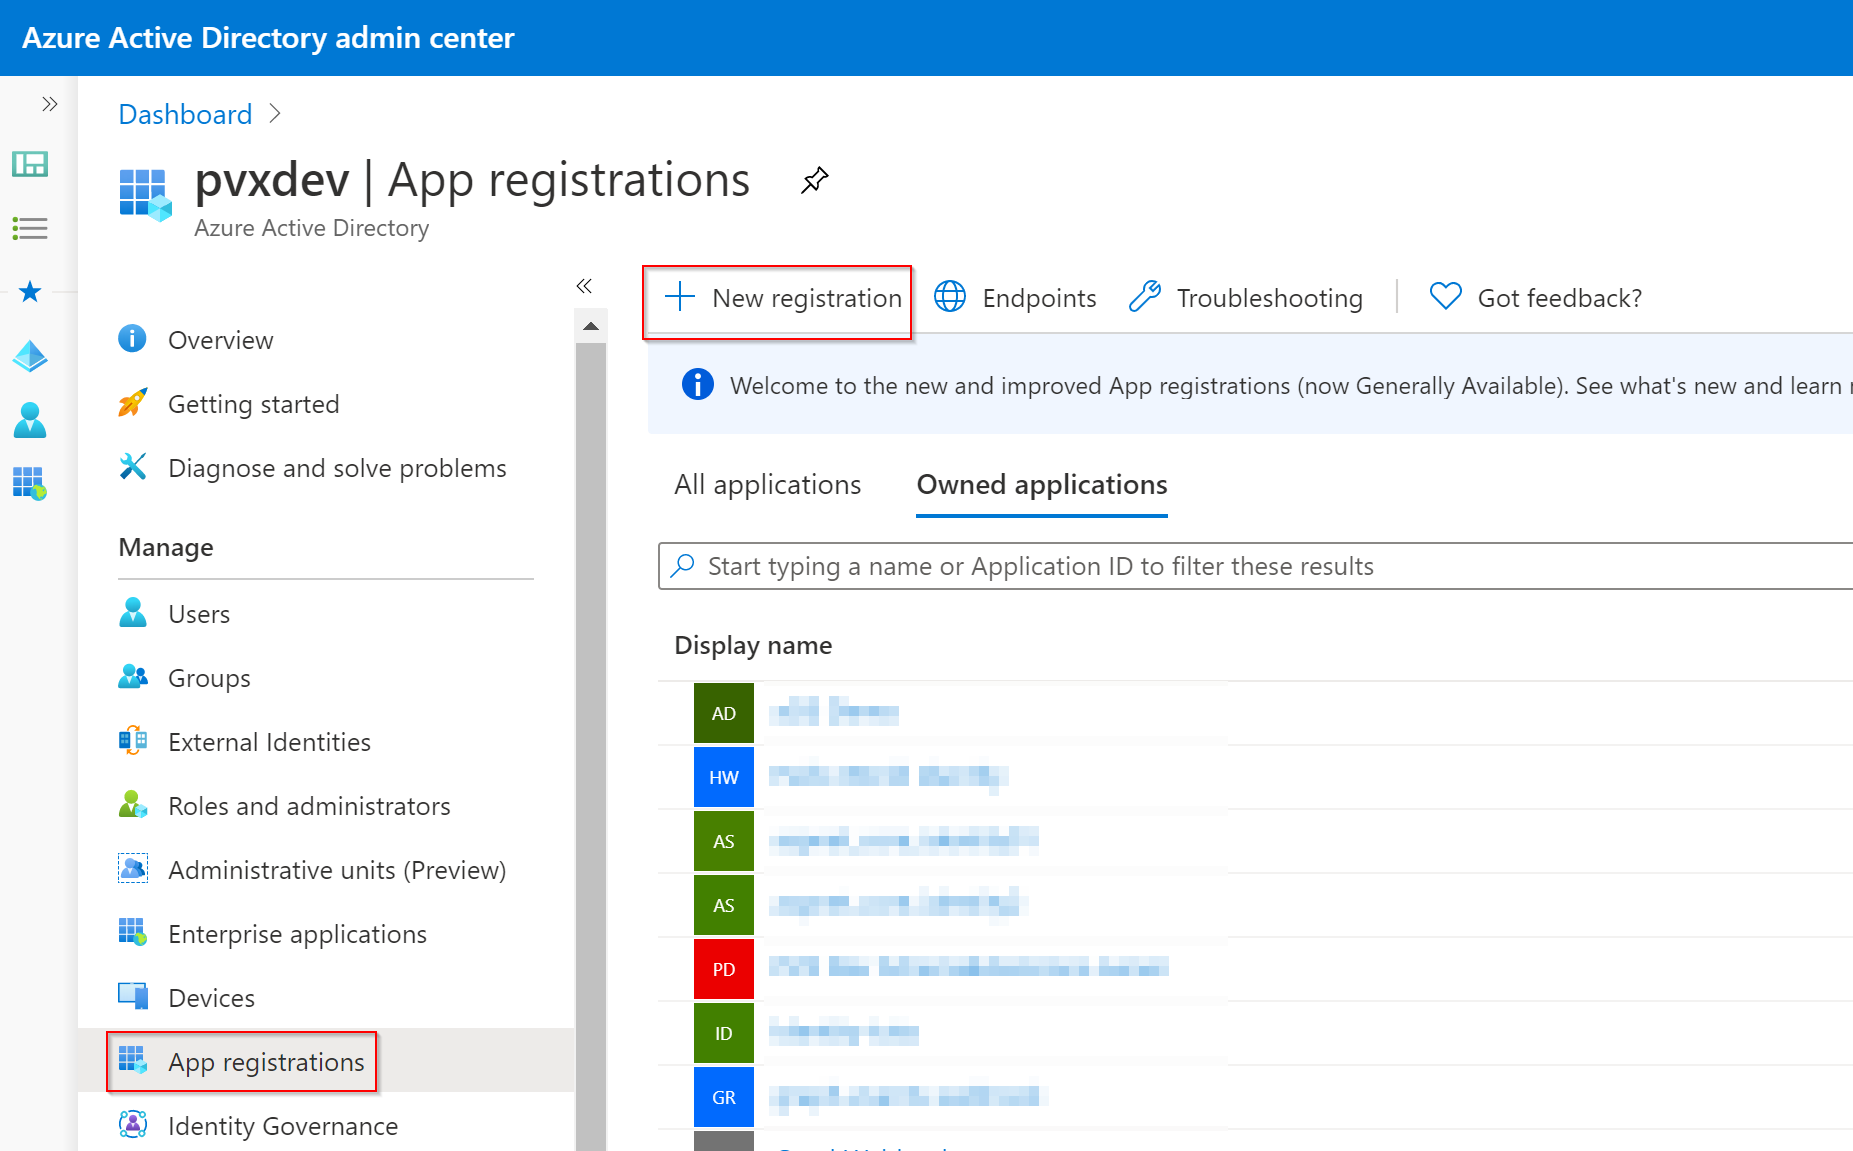
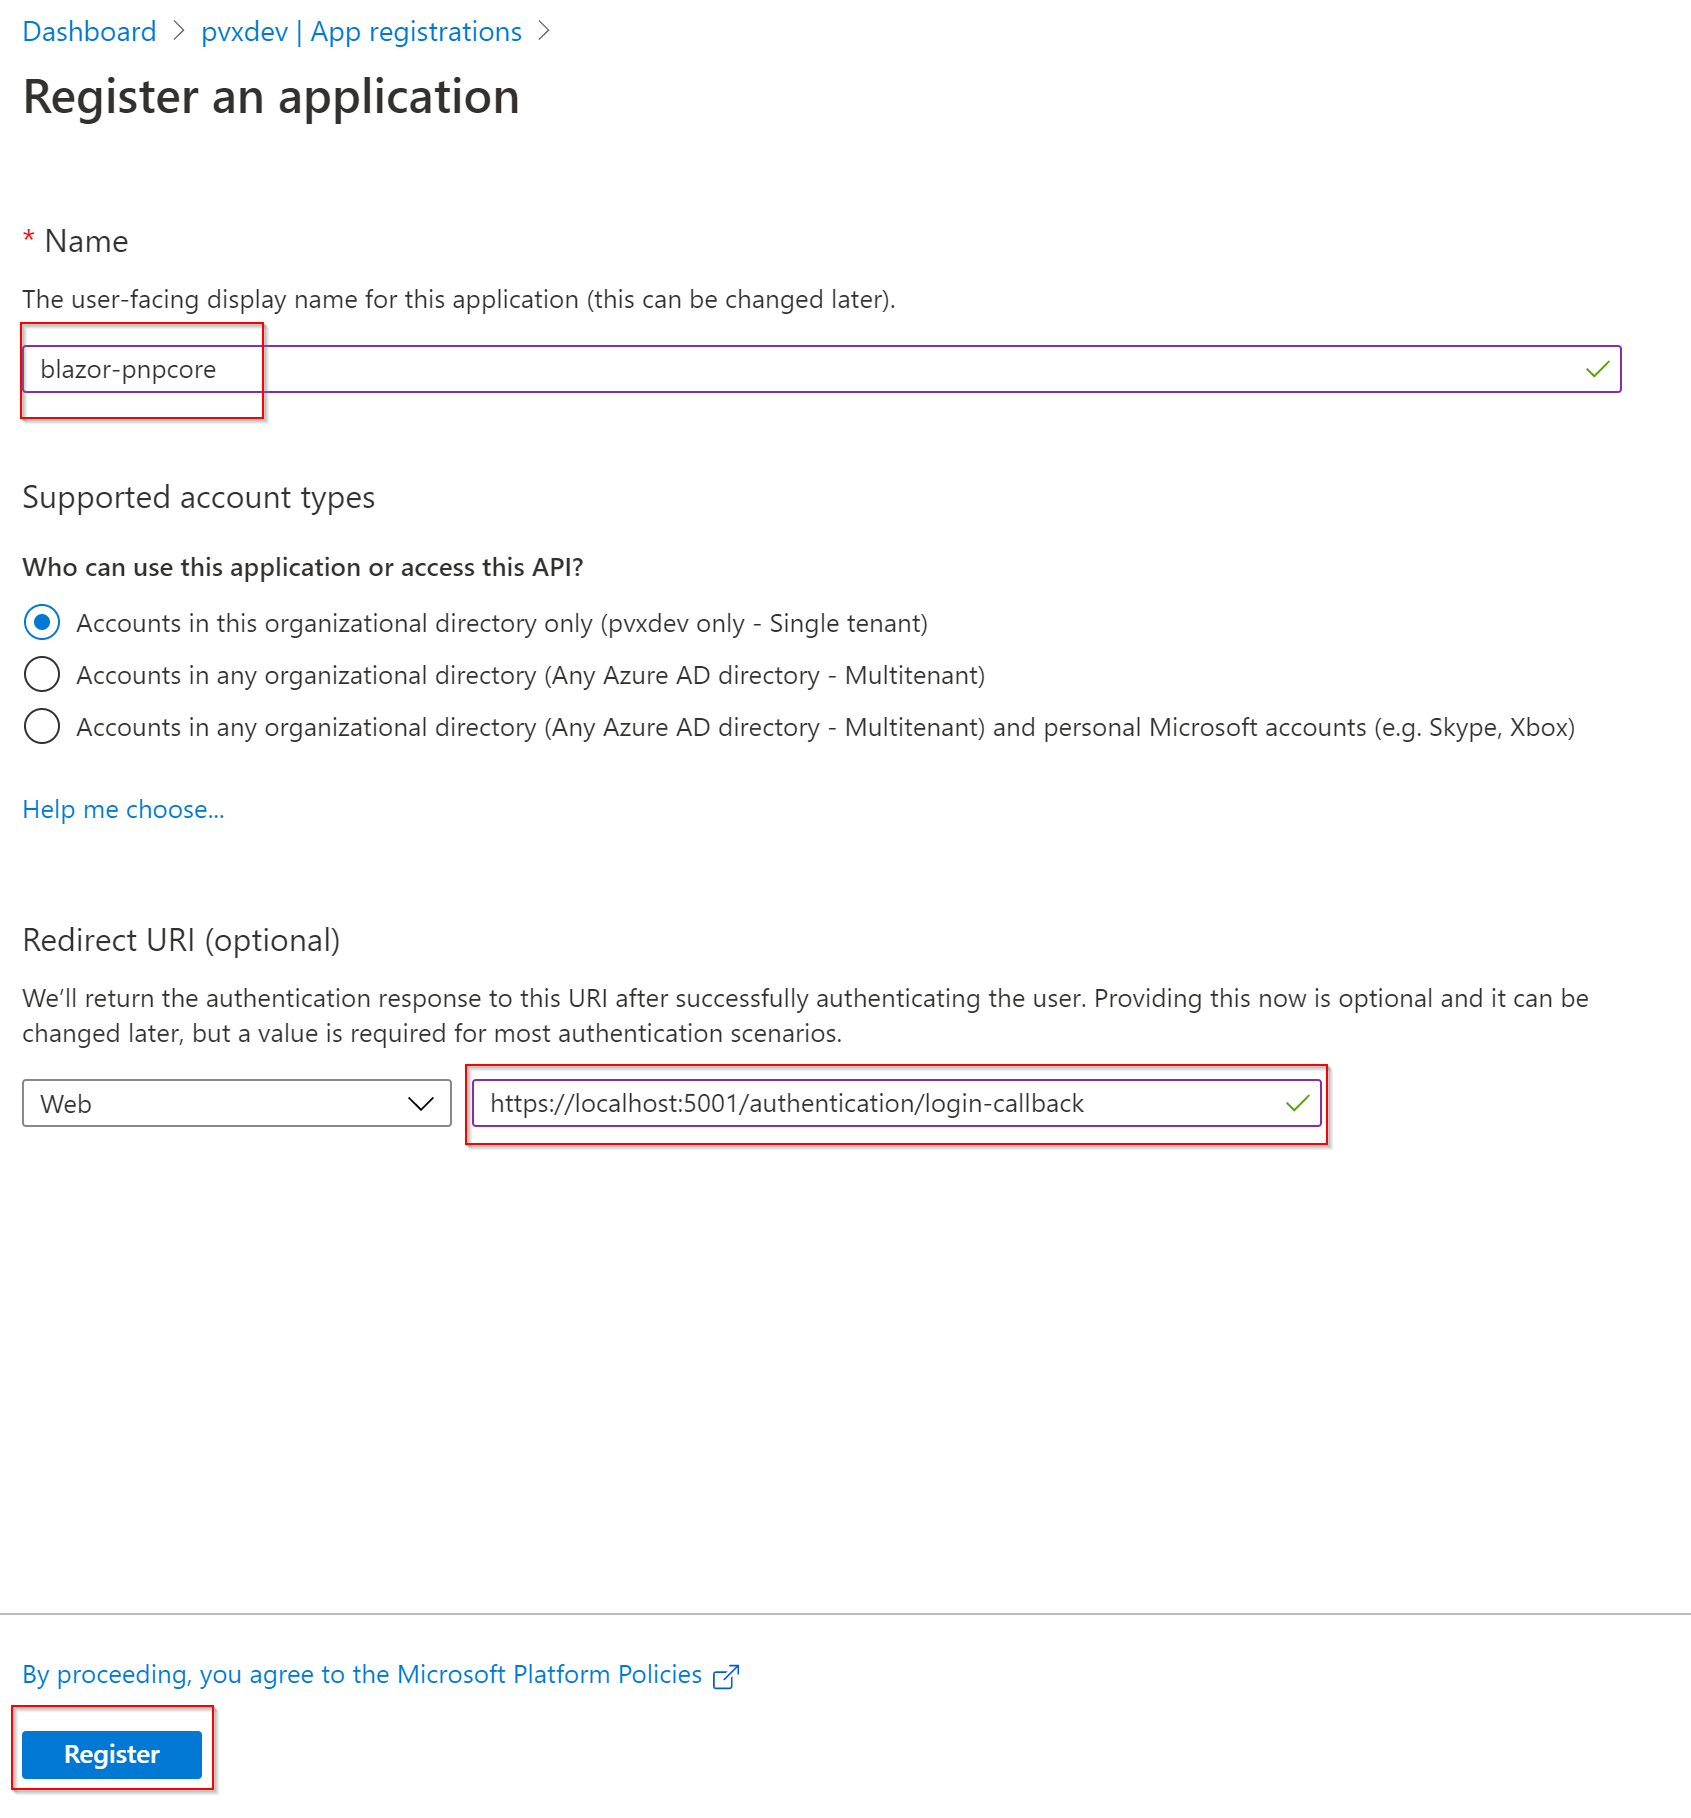
Enter the name of your app and a Redirect URI as https://localhost:5001/authentication/login-callback and click the Register button.
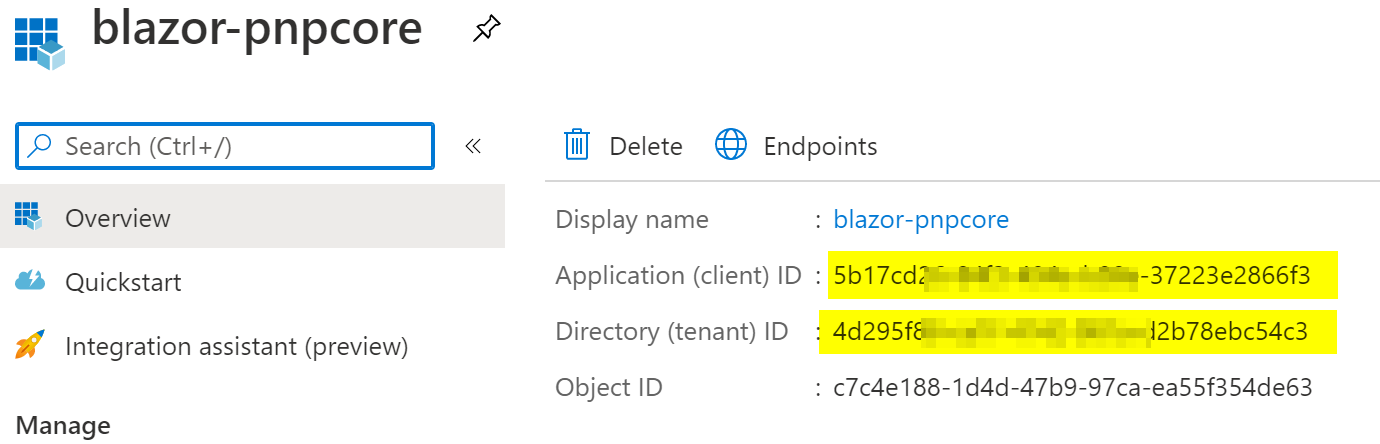
From the Overview tab that appears, copy the Application (client) ID and Directory (tenant) ID and keep them aside.
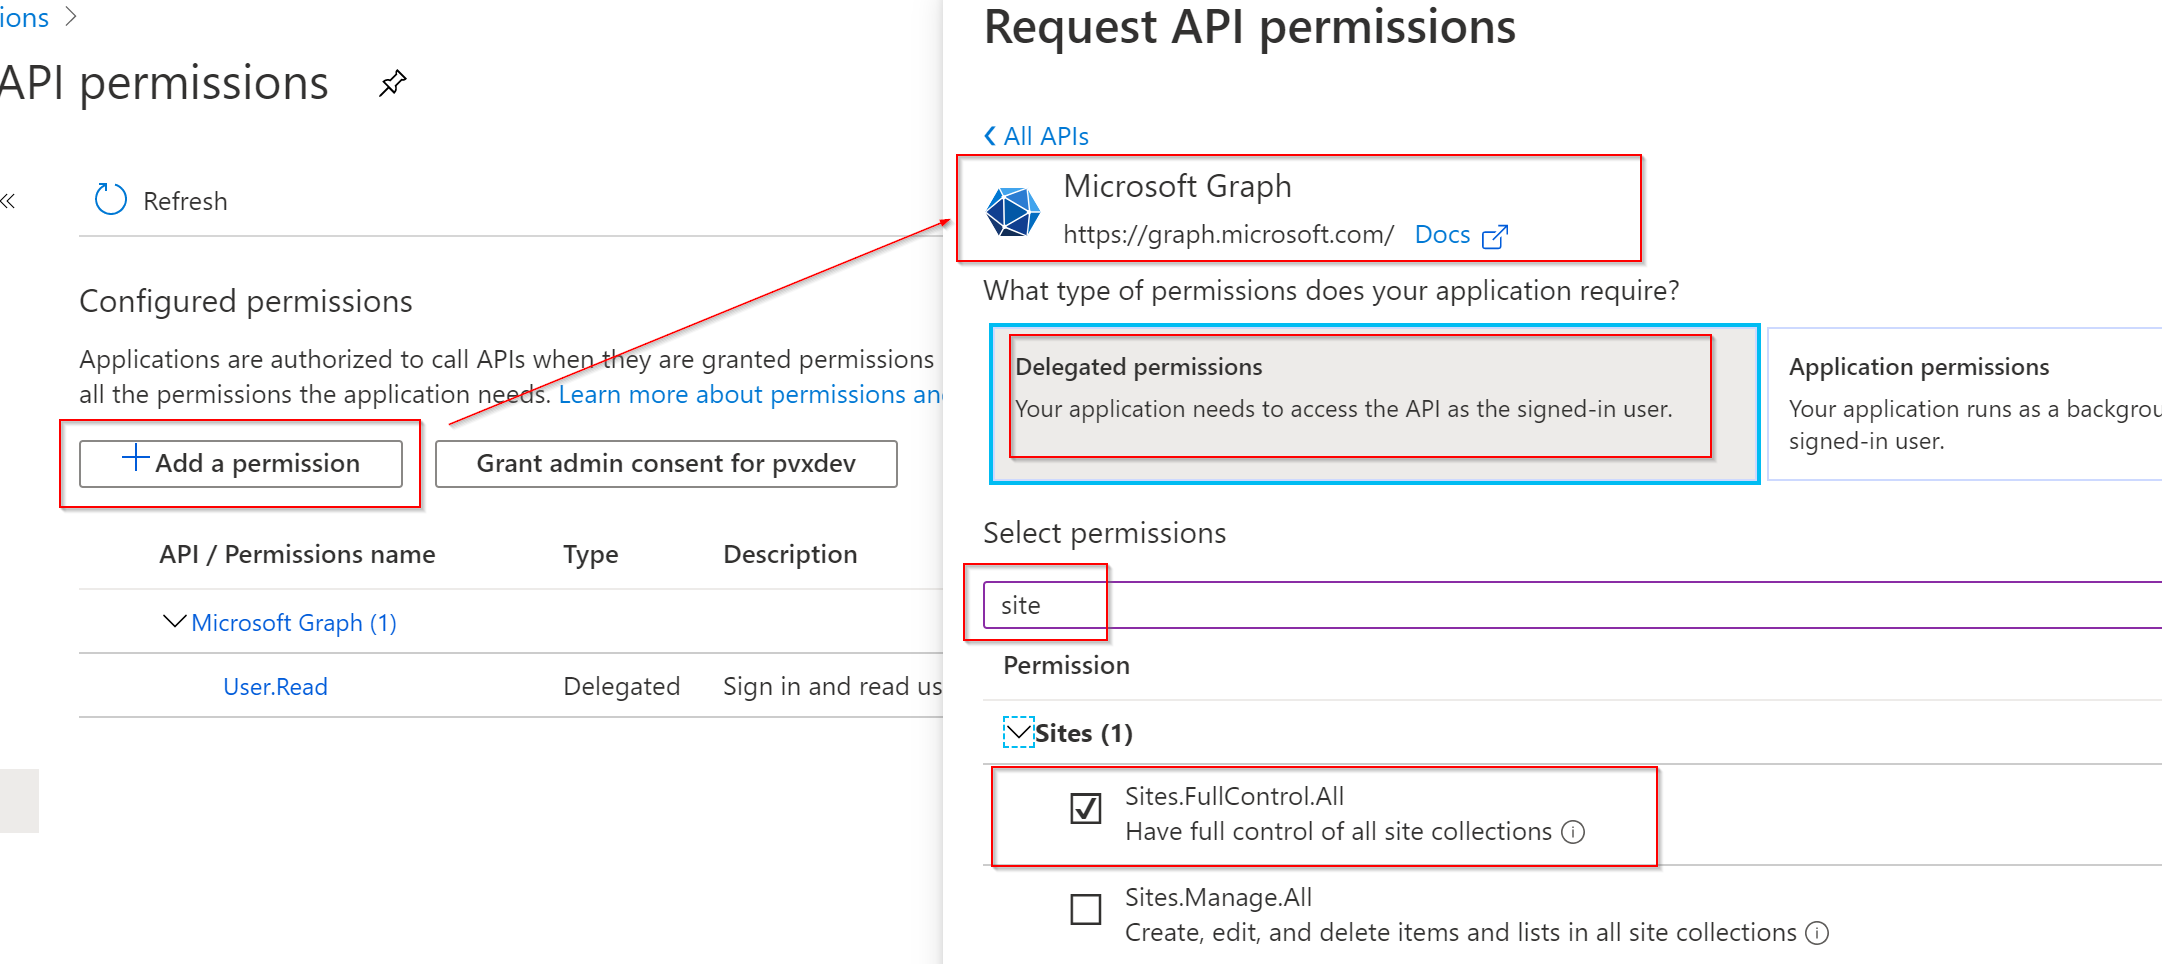
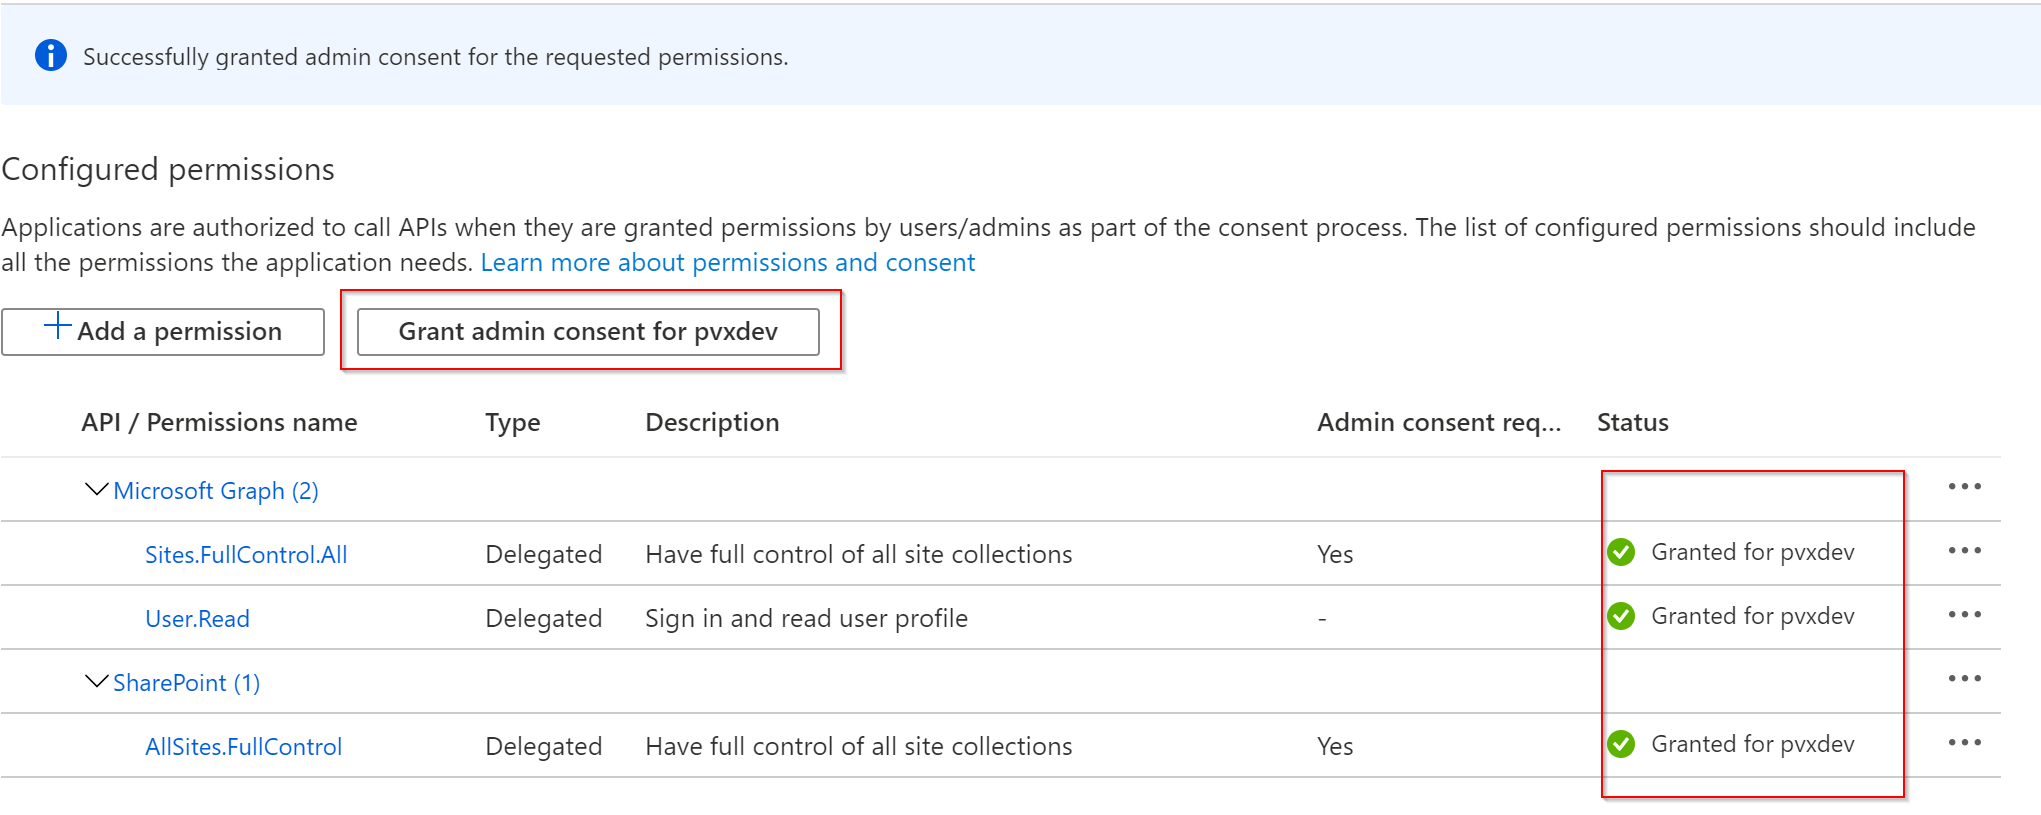
From the API Permissions tab, Add the following permissions for Microsoft Graph and SharePoint Online:
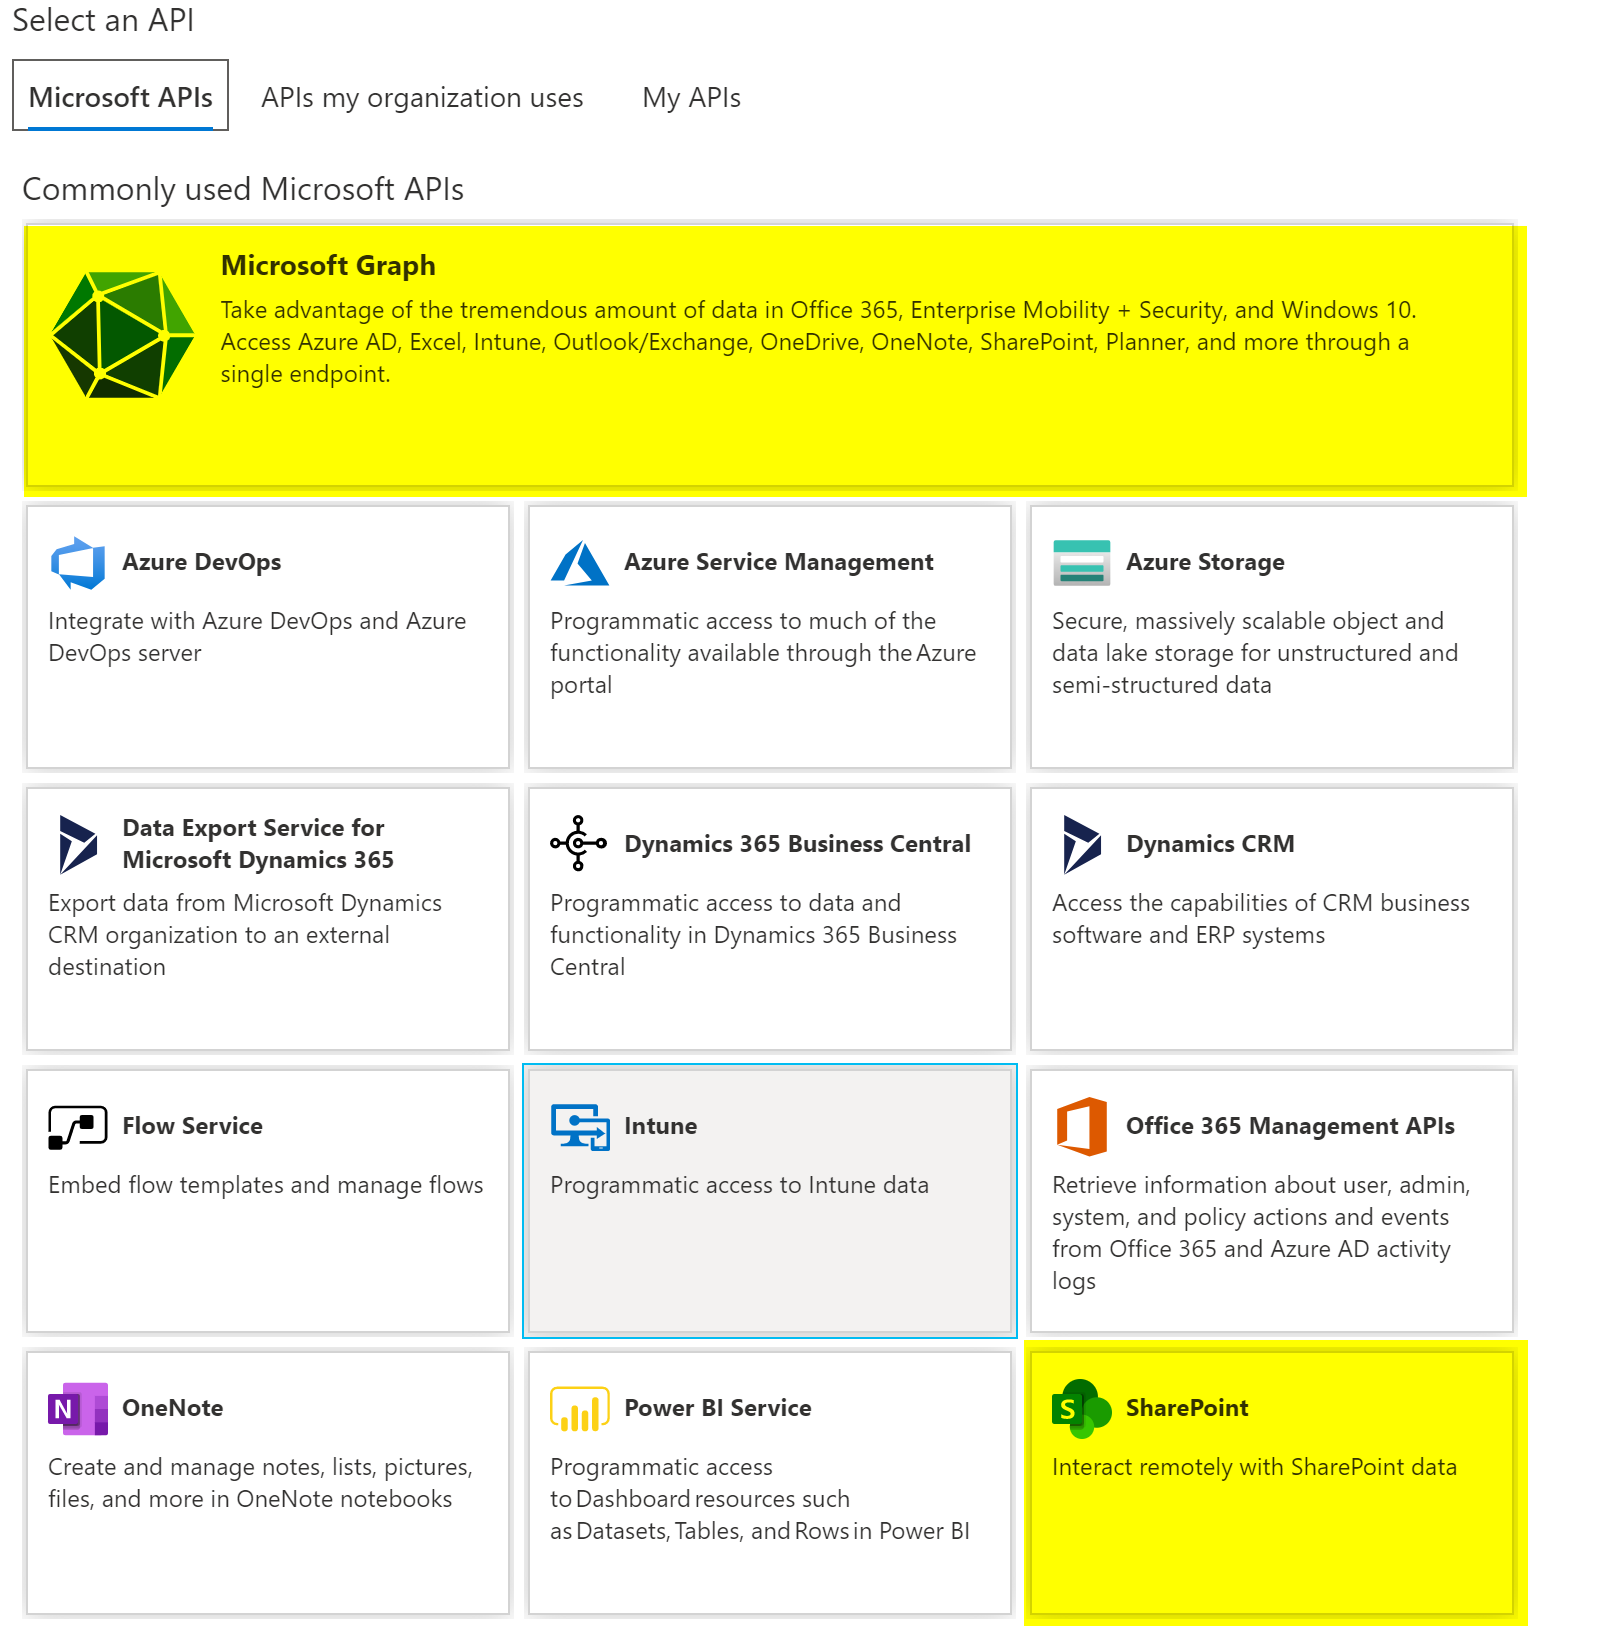
Microsoft Graph>Delegated Permissions>Sites.FullControl.All
SharePoint>Delegated Permissions>AllSites.FullControl
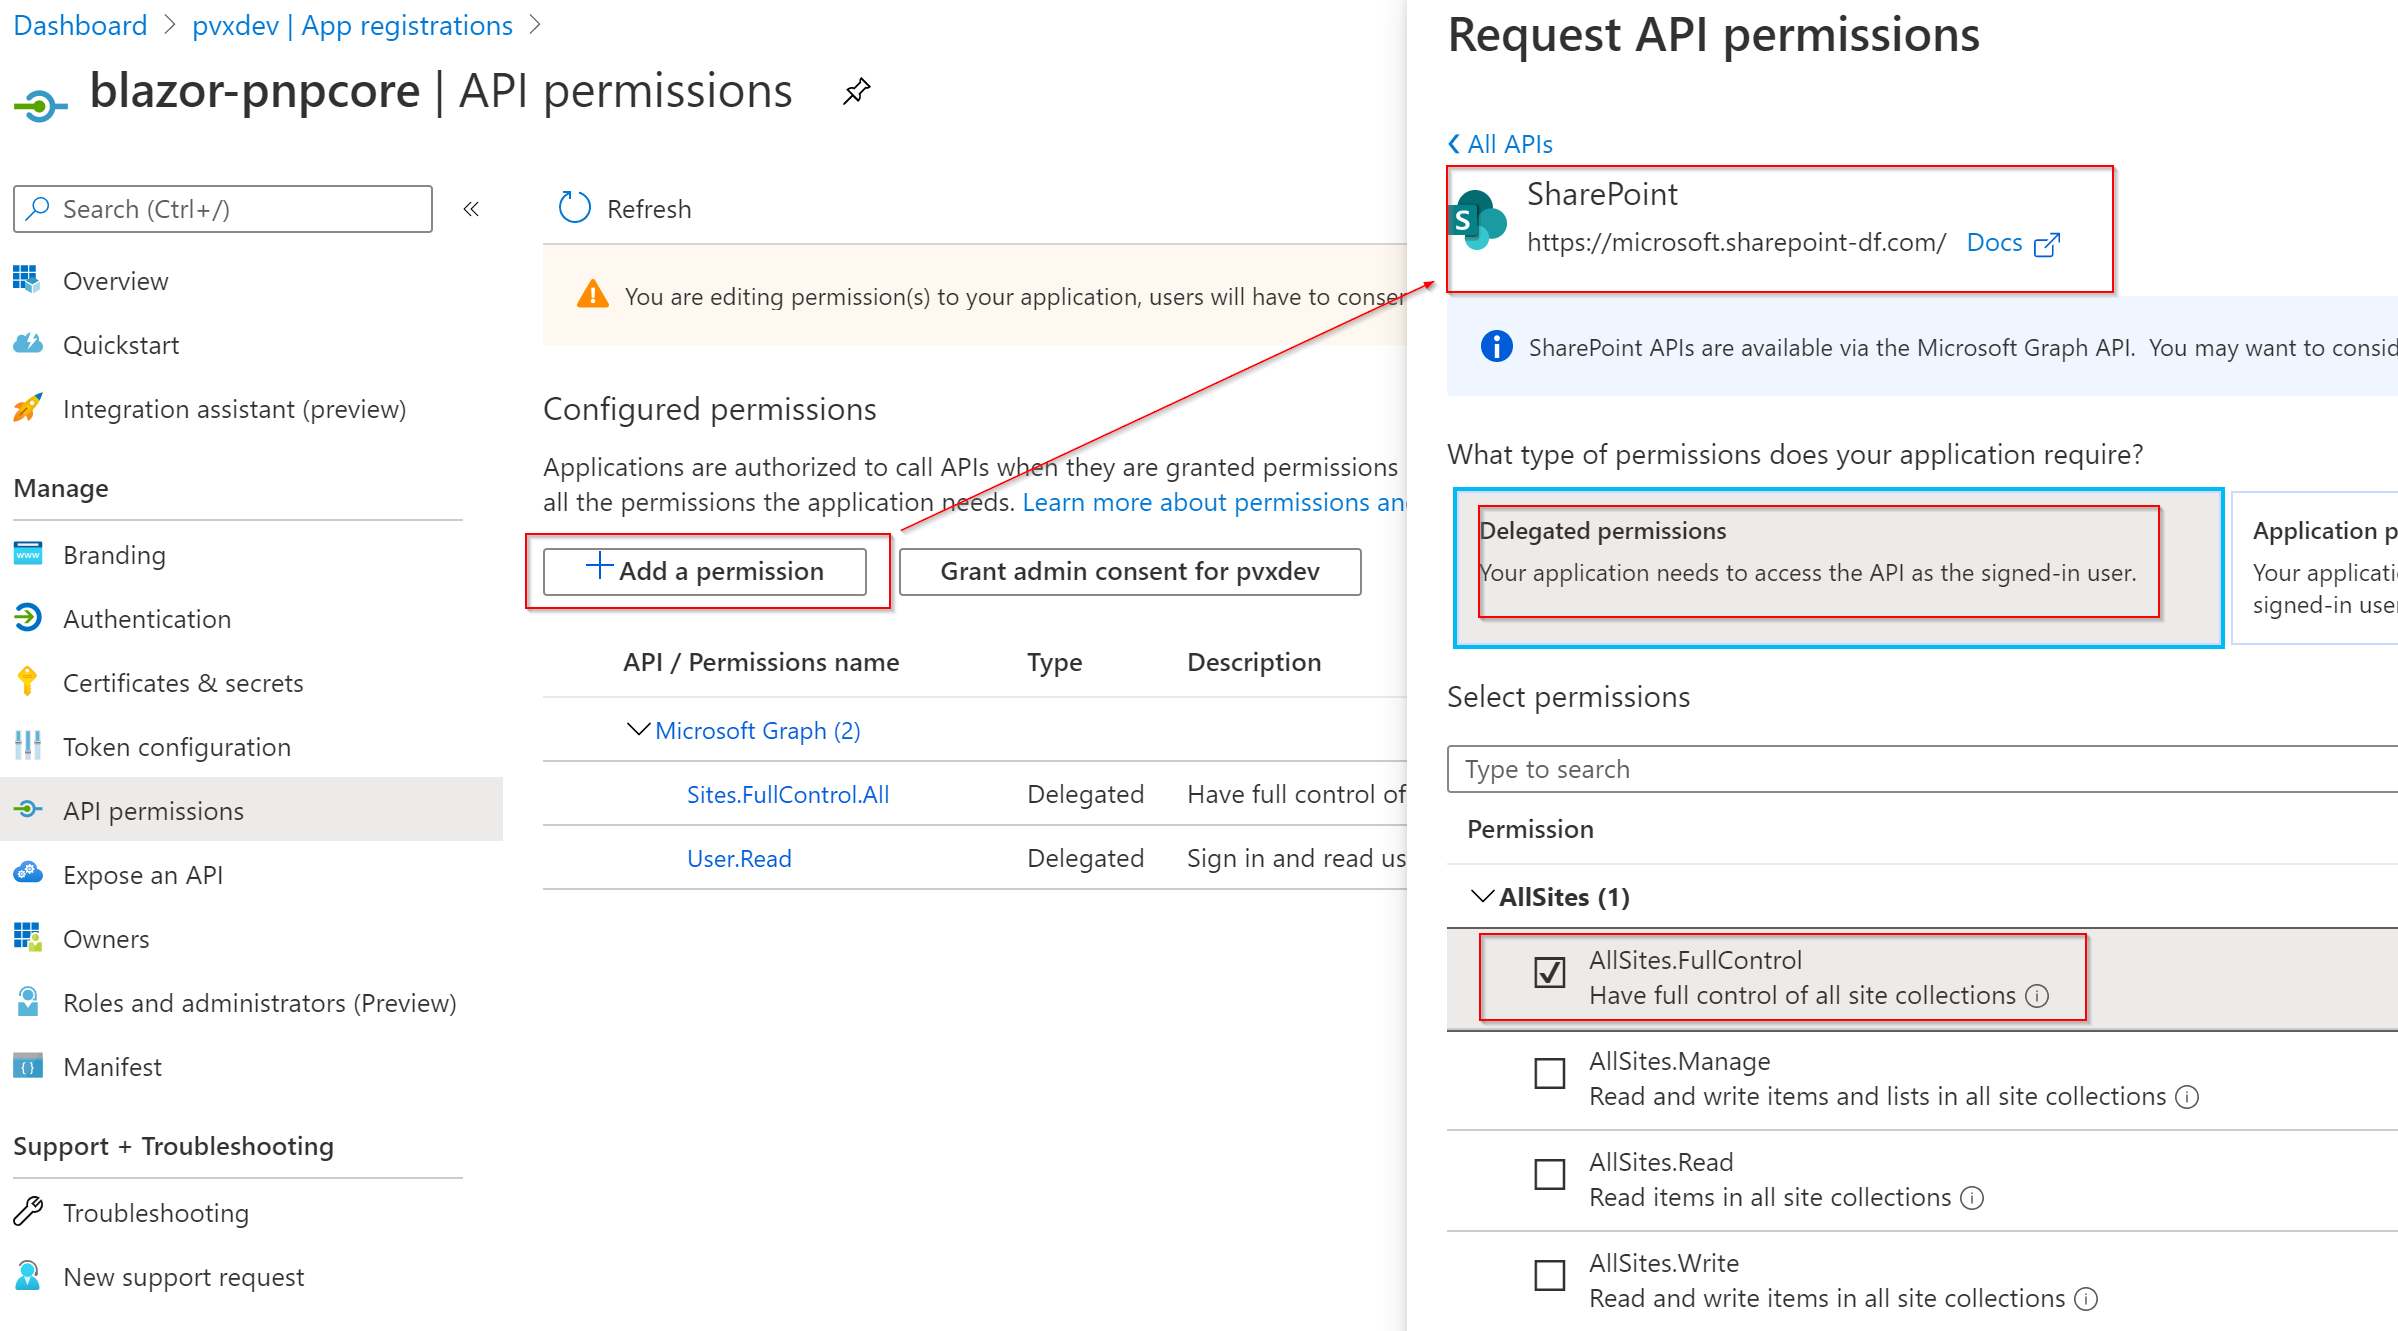
Then, let's grant the permissions as an administrator
IMPORTANT For the sake of simplicity, here, we are granting high privileges permissions, in production scenarios, the recommended practice is to grant the least required privileges to the application, that will prevent information leakage and your application to do something it shouldn't if higly privileged users run it.
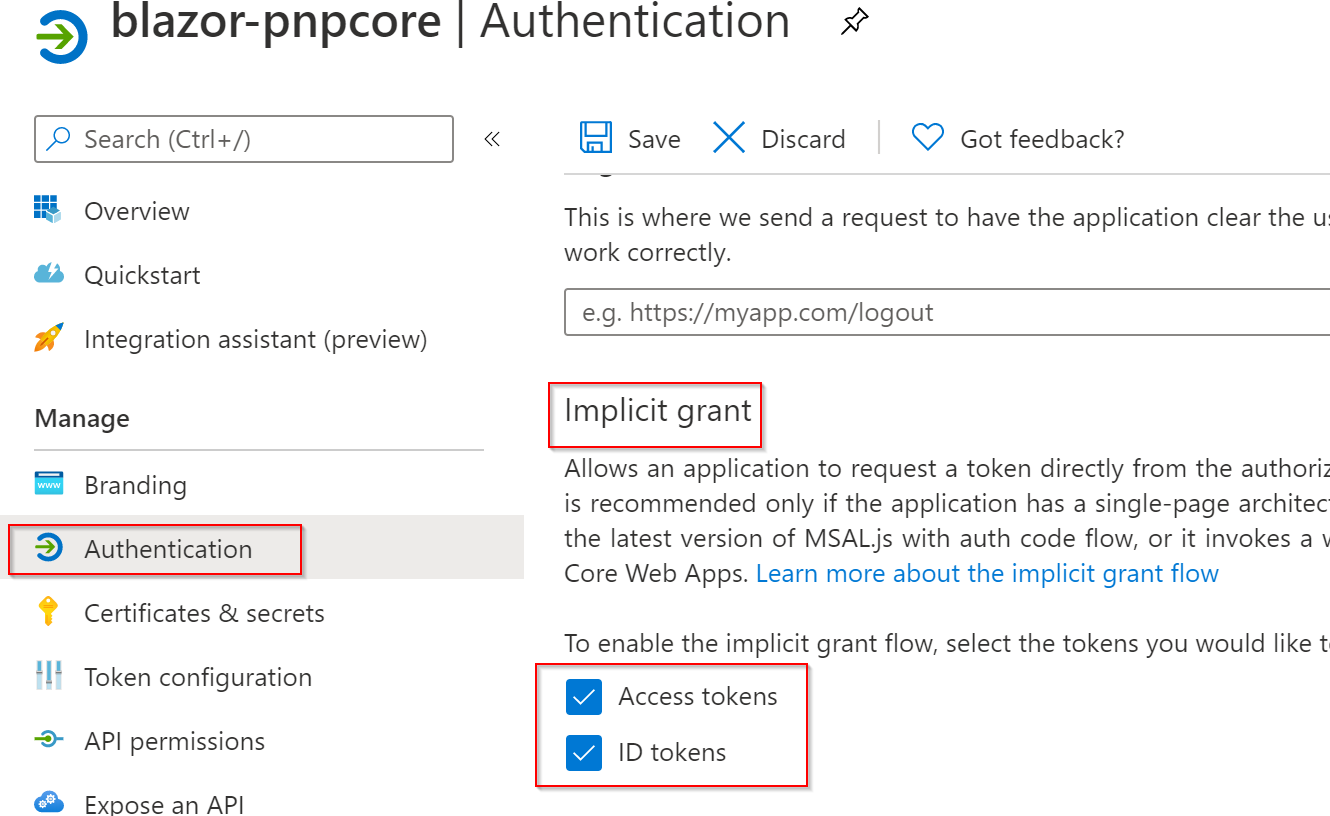
Last thing to do here is to enable Implicit Grant access tokens. Indeed, we will develop a client side application that cannot store a secret! Implicit Grant flow is then required here.
For the Authentication tab, tick the check boxes in the Implicit Grant section and save your changes.
Create a new Blazor WebAssembly project
Open up a command prompt and type the following:
(Replace the {App Id} by the Application Id and {Tenant Id} by the Directory Id copied earlier)
dotnet new blazorwasm -au SingleOrg -o blazor_pnpcore --client-id "{App Id}" --tenant-id "{Tenant Id}"
NOTE: Just to make sure, everything is OK, open up the solution folder in Visual Studio Code and hit F5. It will ask you the debug runtime you want to use, select Blazor WebAssembly Debug
That requires Google Chrome to be installed
If it doesn't work at the first time, close the browser and hit F5 again in VS Code, that should do the trick Recently I encountered some issues with the Chrome Debugger and VS Code. (Cannot connect to debugger) If you encounter the same, to go further here, you can open the terminal and use the
dotnet runcommand, then navigate to https://localhost:5001
We can eventually clean up the following files, we will not need them:
- /Pages/Counter.razor
- /Pages/FetchData.razor
- /Shared/SurveyPrompt.razor
- /wwwroot/sample-data/
And update the NavMenu.razor file accordingly.
Install the PnP Core SDK dependency
- Install the PnP Core SDK Preview 2
dotnet add package PnP.Core --version 0.1.2007.19-blazor-preview2
NOTE Currently, we have a custom build dedicated to Blazor because of some dependencies that are not compatible. We are definitely looking to have a universal package on the long term, but again, only future will tell if this is going to happen according to the dependencies constraints
Implement an authentication provider wrapper for PnP Core SDK
The existing Blazor authentication library offers an authentication provider that allows to acquire an access token with a proper Azure AD configuration using Implicit Grant OAuth flow. We will need to configure PnP Core SDK to use that access token provided by MSAL. In a /Authentication folder, let's create a MsalWrappedTokenProvider class as follows
using Microsoft.AspNetCore.Components.WebAssembly.Authentication;
using PnP.Core.Services;
using System;
using System.Threading.Tasks;

namespace blazor_pnpcore.Authentication
{
    public class MsalWrappedTokenProvider : IOAuthAccessTokenProvider
    {
        private readonly IAccessTokenProvider _accessTokenProvider;

        public MsalWrappedTokenProvider(IAccessTokenProvider accessTokenProvider)
        {
            _accessTokenProvider = accessTokenProvider;
        }

        private const string MicrosoftGraphScope = "Sites.FullControl.All";
        private const string SharePointOnlineScope = "AllSites.FullControl";

        private async Task<string> GetAccessTokenAsync(string[] scopes)
        {
            var tokenResult = await _accessTokenProvider.RequestAccessToken(new AccessTokenRequestOptions()
            {
                // The scopes must specify the needed permissions for the app to work
                Scopes = scopes,
            }).ConfigureAwait(false);

            if (!tokenResult.TryGetToken(out AccessToken accessToken))
            {
                throw new Exception("An error occured while trying to acquire the access token...");
            }

            return accessToken.Value;
        }


        private string[] GetRelevantScopes(Uri resourceUri)
        {
            if (resourceUri.ToString() == "https://graph.microsoft.com")
            {
                return new[] { $"{resourceUri}/{MicrosoftGraphScope}" };
            }
            else
            {
                string resource = $"{resourceUri.Scheme}://{resourceUri.DnsSafeHost}";
                return new[] { $"{resource}/{SharePointOnlineScope}" };
            }
        }

        public async Task<string> GetAccessTokenAsync(Uri resourceUri)
        {
            return await GetAccessTokenAsync(GetRelevantScopes(resourceUri));
        }
    }
}
As mentioned above, the PnP Core SDK can use either Microsoft Graph or SharePoint Rest API. It must then be able to request an access token for both resources. This class takes care of requesting the access token for these resources.
Configure the services of our application
We have to tell our application to use a sepcific configuration to access SharePoint
In the /wwwroot/appsettings.json, add the SharePoint section and add its SiteUrl property configured with the URL of your target site.
{
  "SharePoint": {
    "SiteUrl": "https://{tenant}.sharepoint.com/sites/{site}/"
  },
  "AzureAd": {
      ...omitted for  brevity...
  },
  "Logging": {
      ...omitted for  brevity...
  }
}
In this file, replace the placeholders by the actual values
| placeholder | Value |
|---|---|
| tenant | the name of your tenant (e.g. contoso if your SharePoint URL is https://contoso.sharepoint.com) |
| site | the URL segment for your selected target SharePoint site |
In the Program.cs, we will configure the services we want to use. Open that file and make it look like:
using System;
using System.Net.Http;
using System.Collections.Generic;
using System.Threading.Tasks;
using System.Text;
using Microsoft.AspNetCore.Components.WebAssembly.Hosting;
using Microsoft.Extensions.Configuration;
using Microsoft.Extensions.DependencyInjection;
using Microsoft.Extensions.Logging;
using PnP.Core.Services;
using blazor_pnpcore.Authentication;

namespace blazor_pnpcore
{
    public class Program
    {
        public static async Task Main(string[] args)
        {
            var builder = WebAssemblyHostBuilder.CreateDefault(args);
            builder.RootComponents.Add<App>("app");

            builder.Services.AddScoped(sp => new HttpClient { BaseAddress = new Uri(builder.HostEnvironment.BaseAddress) });

            var config = new ConfigurationBuilder().Build();

            builder.Services.AddMsalAuthentication(options =>
            {
                builder.Configuration.Bind("AzureAd", options.ProviderOptions.Authentication);
            });

            string pnpConfigName = "BlazorAppSample";
            string authConfigName = "OAuthAccessToken";
            builder.Services
              .AddScoped<IOAuthAccessTokenProvider, MsalWrappedTokenProvider>()
              .AddSingleton<IConfiguration>(config)
              .AddAuthenticationProviderFactory(options => options.Configurations
                .Add(new OAuthAccessTokenConfiguration()
                {
                    Name = authConfigName
                }))
              .AddPnPContextFactory(options => options.Configurations
                .Add(new PnPContextFactoryOptionsConfiguration()
                {
                    Name = pnpConfigName,
                    AuthenticationProviderName = authConfigName
                }))
              .AddScoped<PnPContext>(services => {
                  // Get the configuration at runtime
                  var config = services.GetService<IConfiguration>();
                  var factory = services.GetService<IPnPContextFactory>();
                  return factory.Create(new Uri(config.GetValue<string>("SharePoint:SiteUrl")), authConfigName);
              });

            await builder.Build().RunAsync();
        }
    }
}
Let's add the required imports in order to keep our next components code more concise, open the _Imports.razor file and add the following lines to it:
@using Microsoft.AspNetCore.Authorization
@using PnP.Core.Services
@using PnP.Core.Model.SharePoint
We have now set up the boilerplate, we can finally start building our component to work with Microsoft 365 Data : Let's implement our interesting code in the Index.razor component in the /Pages folder. Replace its content by
@page "/"
@* Let's make sure only authenticated users can access this component *@
@attribute [Authorize]
@* Let's inject the PnP Context for current user on the configured site *@
@inject PnPContext pnpCtx

<h2>SharePoint Site Info</h2>
@if (isLoadingWeb)
{
    <p><em>Loading SharePoint site information...</em></p>
}
else
{
    <table>
        <tr>
            <td>Name</td>
            <td>@web.Title</td>
        </tr>
        <tr>
            <td>Description</td>
            <td>@web.Description</td>
        </tr>
    </table>
}

<h2>Visible lists in the site</h2>
@if (isLoadingLists)
{
    <p><em>Loading SharePoint lists...</em></p>
}
else
{
    <table>
    <tr>
        <th>Name</th>
        <th>Id</th>
    </tr>
    @foreach (var list in lists) {
        <tr>
            <td>@list.Title</td>
            <td>@list.Id</td>
        </tr>
    }
    </table>
}

<h2>Document related Content Types in the site</h2>
@if (isLoadingContentTypes)
{
    <p><em>Loading SharePoint Content Types...</em></p>
}
else
{
    <table>
    <tr>
        <th>Name</th>
        <th>Id</th>
    </tr>
    @foreach (var contentType in contentTypes) {
        <tr>
            <td>@contentType.Name</td>
            <td>@contentType.Id</td>
        </tr>
    }
    </table>
}


@code {
    protected override async Task OnInitializedAsync()
    {
        await LoadWeb();
        await LoadVisibleLists();
        await LoadContentTypes();
    }

    private IWeb web;
    private bool isLoadingWeb = true;
    private async Task LoadWeb()
    {
        // Load  onlythe Web properties we want to display
        web = await pnpCtx.Web.GetAsync(p => p.Title, p => p.Description);
        isLoadingWeb = false;
    }

    private List<IList> lists;
    private bool isLoadingLists = true;
    private async Task LoadVisibleLists()
    {
        // Write simple linq query
        var listsQuery = from l in pnpCtx.Web.Lists
                         where !l.Hidden
                         select l;

        // Get the result asynchronously
        lists = await listsQuery.ToListAsync();
        isLoadingLists = false;
    }

    private List<IContentType> contentTypes;
    private bool isLoadingContentTypes = true;
    private async Task LoadContentTypes()
    {
        // Write more complex linq queries to only fetch specific information
        var ctQuery = from ct in pnpCtx.Web.ContentTypes.Include(c => c.Name, c => c.Id)
                      where ct.Group == "Document Content Types"
                      select ct;

        // Get the result asynchronously
        contentTypes = await ctQuery.ToListAsync();
        isLoadingContentTypes = false;
    }
}
Let's run the application, hit F5 in Visual Studio Code if it works, otherwise execute the dotnet run command and browse https://localhost:5001/
Your Blazor application gets started, and you should be prompted for your Microsoft 365 credentials. Once signed in, you are redirected to your app that displays some information about the SharePoint site you configured.
IMPORTANT In Blazor WebAssembly, the same rules as JavaScript must be followed, a blocking or long running code will block the UI thread and make the application unusable. It is important to remember that only asynchronous calls must always be used in Blazor.
THE future Microsoft 365 .NET SDK
As you can see this SDK makes it easy for .NET developers to work with SharePoint Online and Microsoft 365. The SDK is intended to cover more and more of the Microsoft 365 API landscape and is designed to be a real easy to use library. Some Microsoft Teams API are already covered in this library but, at this point, are not fully compatible with Blazor.
I highly encourage you to play with this cool new library and provide feedback. It might also be a great opportunity for you to contribute to a project that, IMHO, will, at some point, become the new de-facto standard! Future will tell, but I am deeply convinced it will become HUGE!
I hope you enjoyed this post and that it aroused your curisoity about the new PnP Core SDK! I will definitely keep talking and writing about it in the future!
Cheers
Yannick